

Step-by-step guide
How to replace the video card (GPU) and CPU of your laptop: HP ZBook MXM upgrade guide
Short answer: you can replace the video card and CPU of a laptop only if the laptop has a socketed processor and an MXM graphics card, which you find on business mobile workstations such as the HP ZBook, not on most thin or cheap laptops where the chips are soldered. On an upgradeable laptop you remove the keyboard and the heatsink, turn the CPU socket screw half a turn to release the processor, unscrew the MXM card, install the new parts, and reapply a thin layer of thermal paste.
In this video I show the inside of a used HP ZBook that I bought and opened because it was overheating. I explain how to look for compatible laptop video cards and laptop CPUs, how the keyboard and heatsink come off, how the CPU socket lock works, how the MXM card is held by only two screws, and why the heatsink limits how powerful a CPU or GPU you can put in. At the end I also show the RAM slots and the NVMe and SATA storage bays. The steps below follow the video, with photos from the job, plus a compatibility checklist, a troubleshooting table and an FAQ.
In this article
- Check that your laptop has a socketed CPU and an MXM GPU
- Find a compatible MXM video card
- Pick a compatible laptop CPU
- Turn the laptop over and remove the bottom screws
- Pry up the keyboard
- Unplug the keyboard cables
- Remove the heatsink screws over the CPU and GPU
- Clean off the old thermal paste
- Unlock the CPU socket with a half turn
- Swap the processor
- Remove the two screws holding the MXM video card
- Replace the MXM graphics card
- Apply thin thermal paste and reinstall the heatsink
- Upgrade the RAM and storage while you are in there
- Why you can't upgrade the GPU or CPU on most laptops
- Laptop GPU and CPU compatibility checklist
- The heatsink sets the limit
- Thermal paste: how much is enough
- Troubleshooting after a laptop GPU or CPU upgrade
- Tips before you buy parts
- Frequently asked questions
- Watch the video
Step 1Check that your laptop has a socketed CPU and an MXM GPU
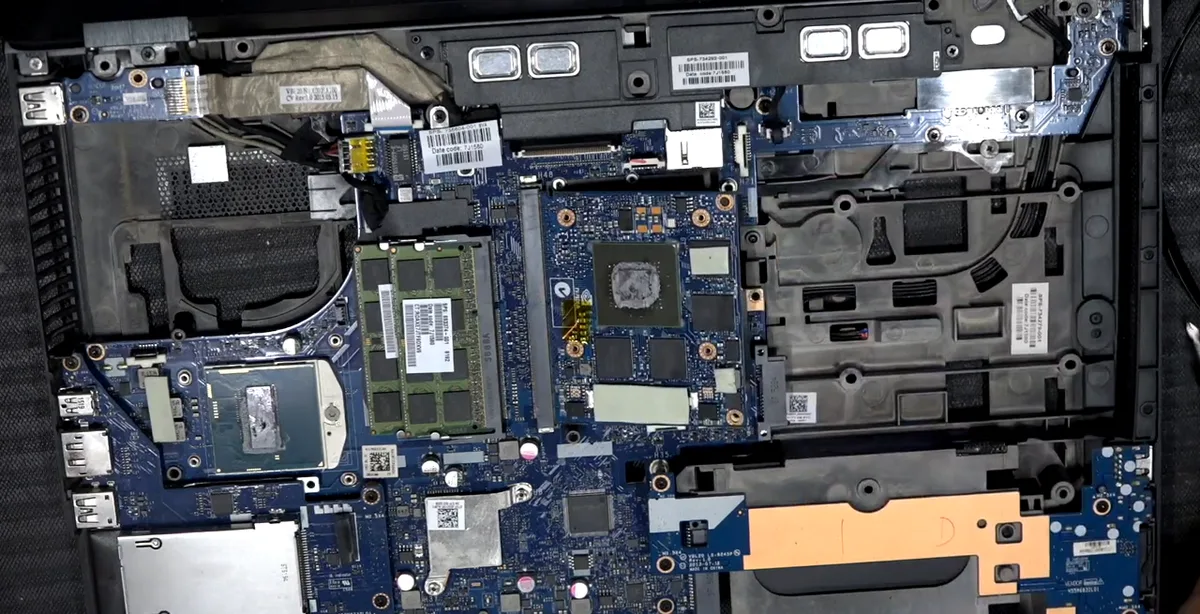
- Not every laptop can do this. On most consumer laptops (the $300 to $600 kind) the CPU and GPU are soldered to the motherboard, so at most you can upgrade RAM or storage.
- Commercial-grade mobile workstations like the HP ZBook are different: the processor sits in a socket and the graphics chip is on a separate MXM card held by screws.
- Gaming laptops can be different again, so check your exact model before buying parts. The HP maintenance and service guide for your model lists which processors and graphics boards are replaceable.
- If you are shopping for a laptop you want to upgrade later, look for this kind of design before you buy.
Step 2Find a compatible MXM video card
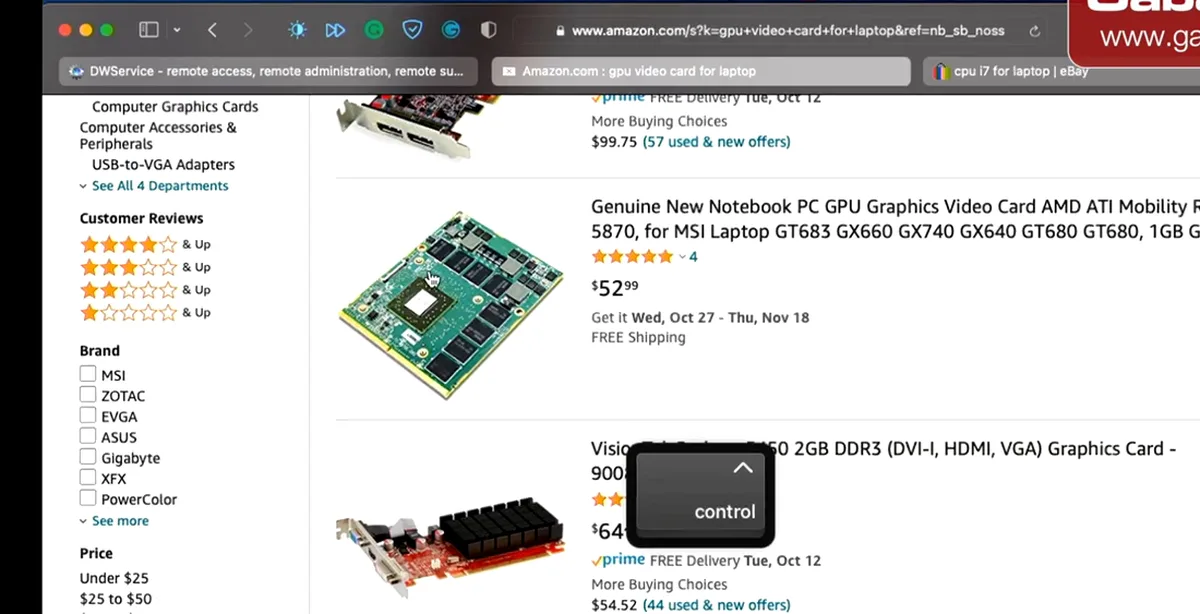
- Laptop video cards do not look like desktop cards. They are small flat MXM modules, while a desktop PCIe card with fans and a bracket will never fit in a laptop.
- Search for your laptop model plus "MXM graphics card". Listings are often labeled for specific brands (Alienware, HP, Dell and others).
- Match the card your laptop shipped with or one the manufacturer lists for that model. Users on the HP support forums report that newer cards may not work without a compatible BIOS or VBIOS.
- As I say in the video, Google is your friend: with the exact model number you can find almost anything.
Caution: A card that physically fits the slot can still fail to boot or have no display if the BIOS does not support it. Check compatibility before you pay.
Step 3Pick a compatible laptop CPU
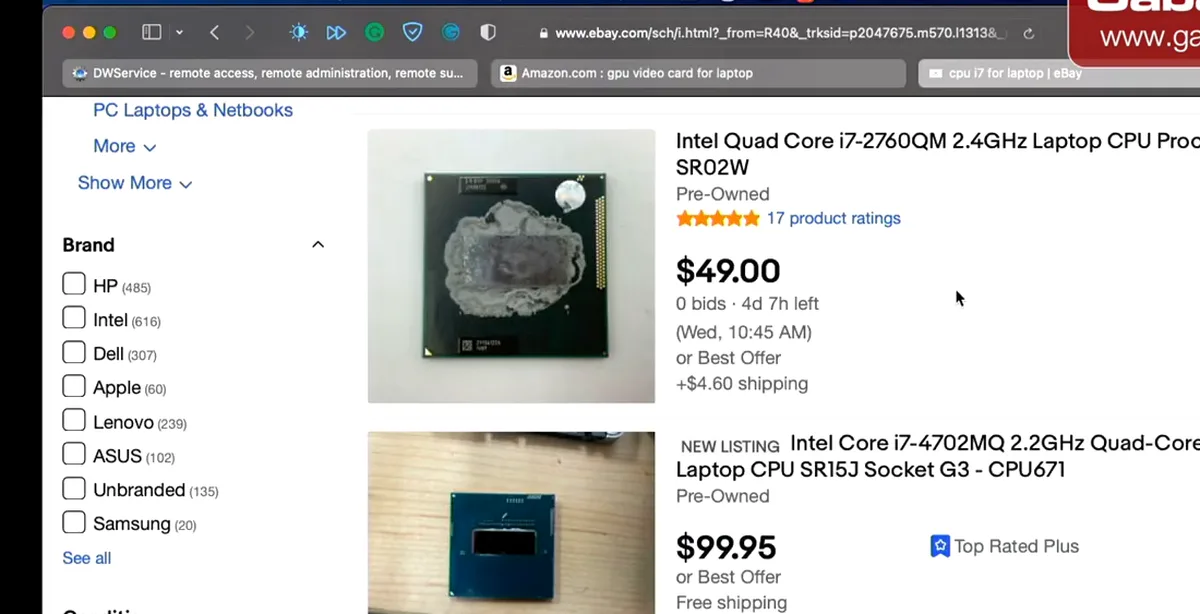
- Search for something like "CPU i7 for laptop" and you will find many mobile processors. The listings in the video show Socket G3 Intel Core i7 quad-core chips.
- The new CPU must use the same socket and be supported by your laptop's chipset and BIOS. For example, the ZBook 17 G2 uses an rPGA947 (Socket G3) socket for Intel 4th-generation mobile CPUs.
- Check the CPU's power rating against the original. A hotter chip may be more than your heatsink can handle (more on that below).
Step 4Turn the laptop over and remove the bottom screws
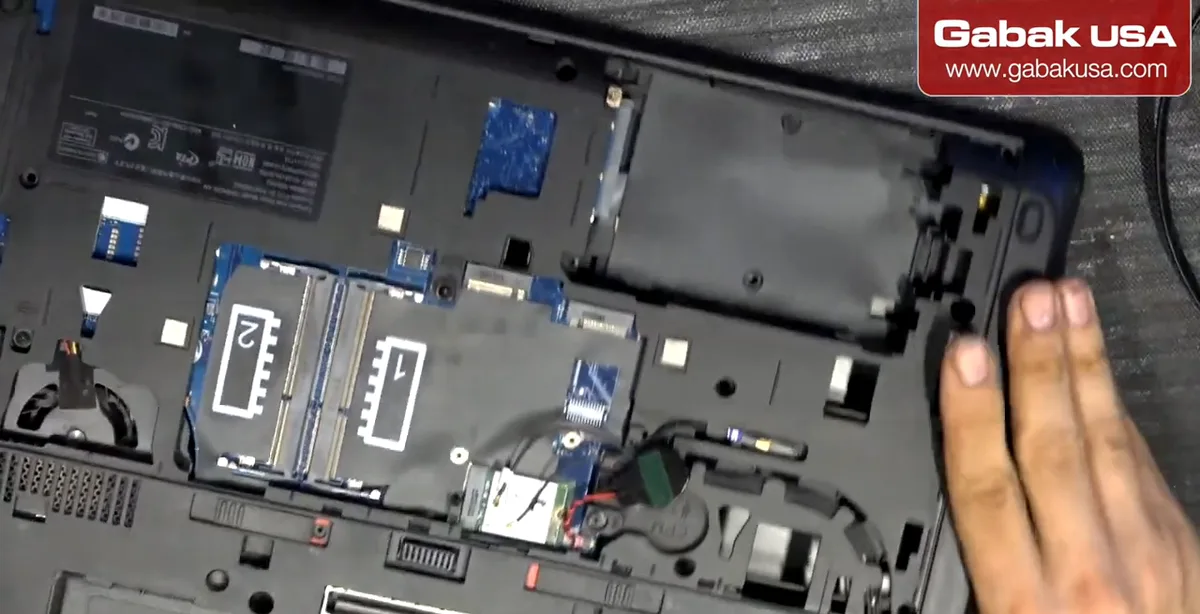
- Shut the laptop down, unplug the charger and remove the battery before you open anything.
- Every brand and model is a little different, so I do not show a full teardown. In general, the keyboard on this ZBook is held by screws on the back of the laptop.
- On this model the screw for the keyboard is marked on the bottom, so the laptop tells you which screw to remove.
- Keep the screws sorted by location. They are often different lengths.
Caution: Wear anti-static gloves or make sure you have no static on your body. Touching the electronics with a static charge can damage them.
Step 5Pry up the keyboard
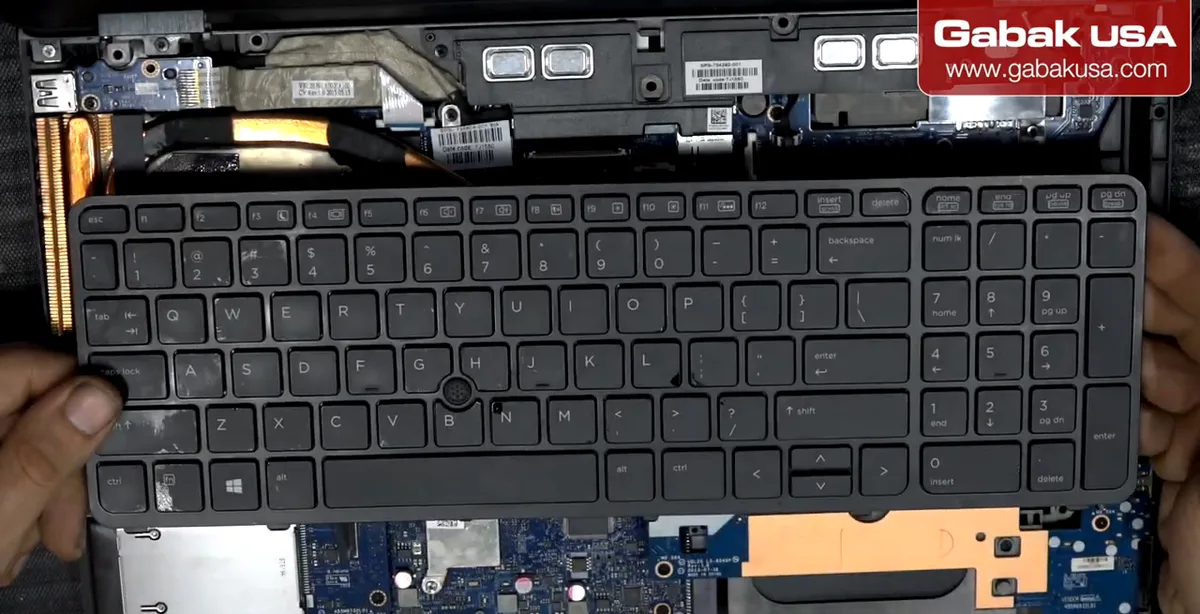
- With the back screws out, flip the laptop over and pry gently at the edge of the keyboard to release it.
- Use a plastic tool, not a metal screwdriver, so you do not scratch the case or bend the keyboard.
- This keyboard is thicker and stronger than the ones on regular budget laptops, which helps here because it does not flex much when you pry.
Step 6Unplug the keyboard cables
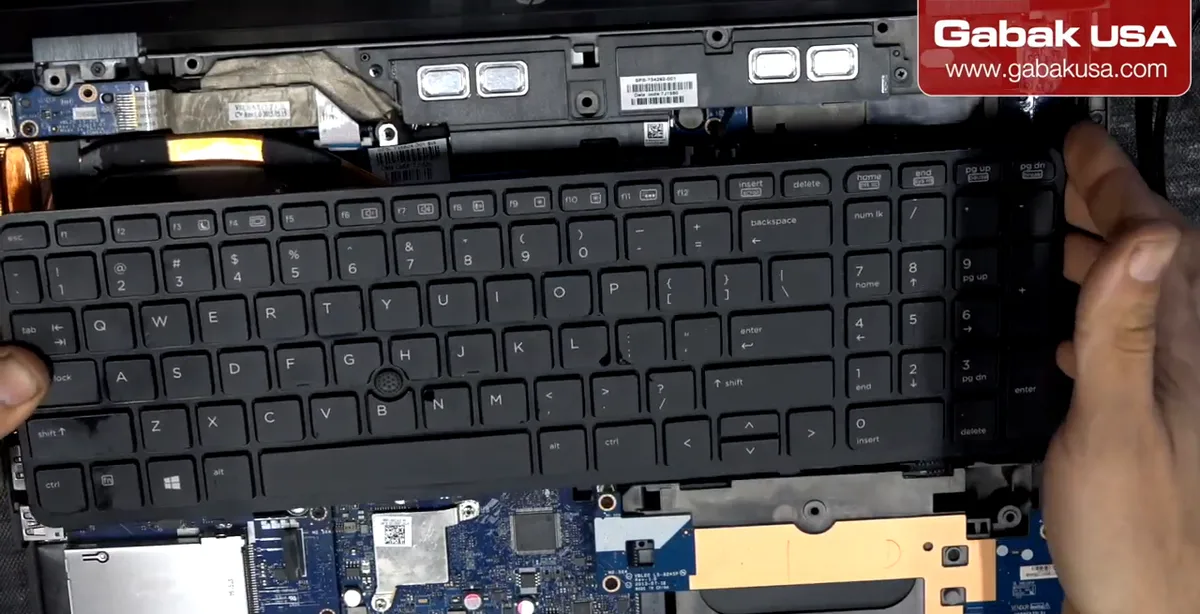
- Do not yank the keyboard away. There is one cable in the middle and another cable along the side of it.
- Open the connector latch, slide the ribbon out, then set the keyboard aside.
- Take a quick photo of the cable routing so reassembly is easier.
Step 7Remove the heatsink screws over the CPU and GPU
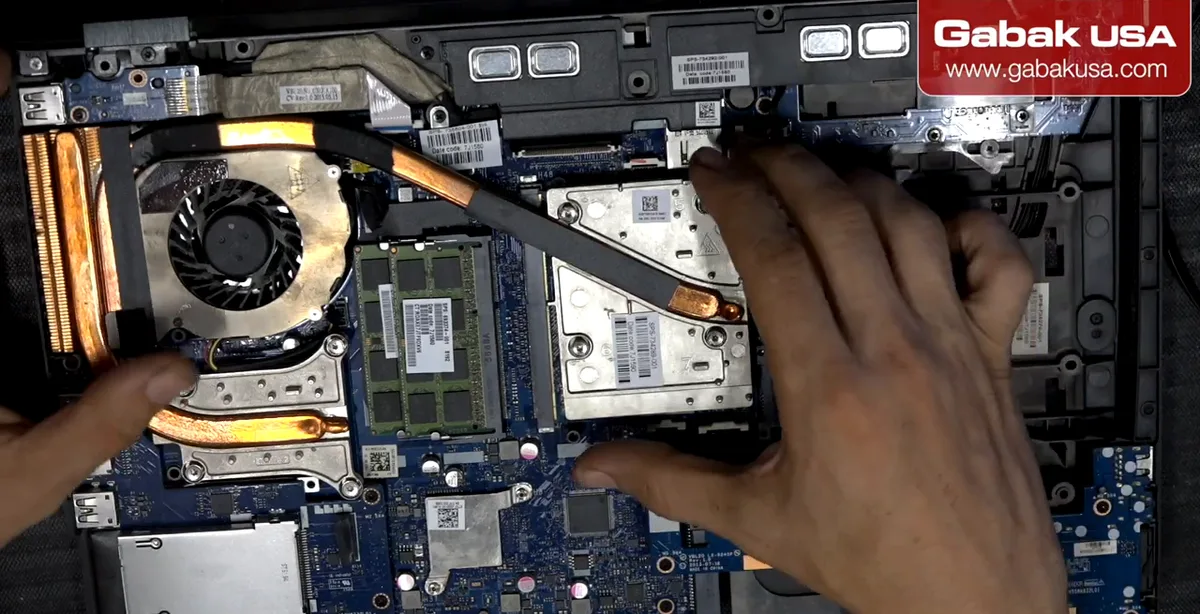
- The heatsink has screws over the processor and over the video card. Remove them all, then lift the heatsink.
- If the screws are numbered, loosen them in reverse order so the heatsink comes off evenly.
- Disconnect the fan cable if your heatsink has the fan attached.
Step 8Clean off the old thermal paste
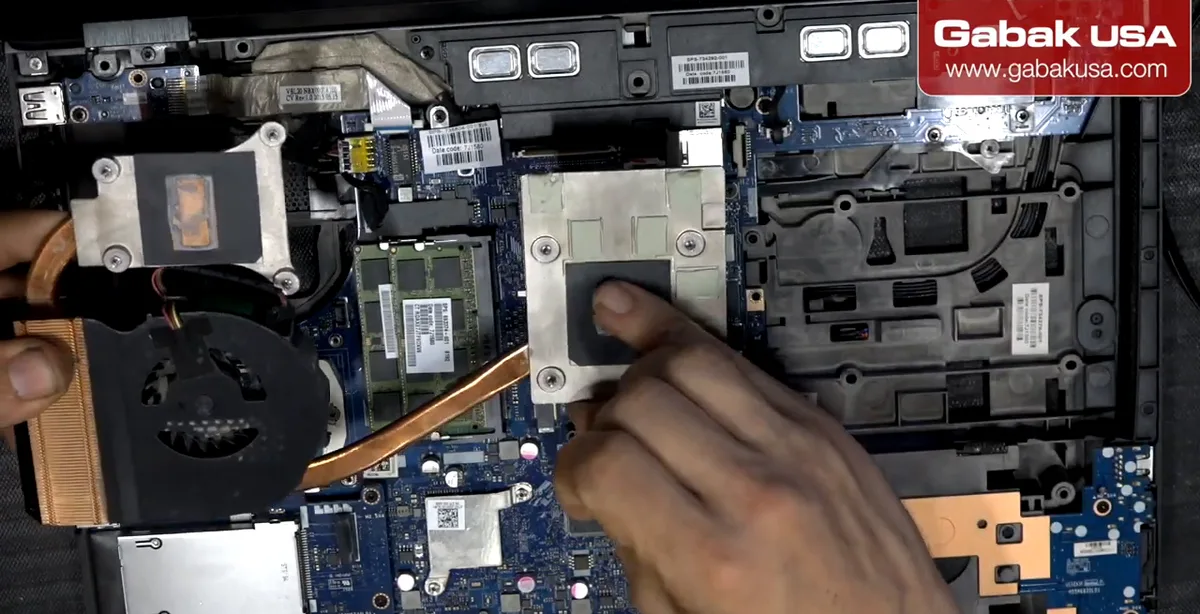
- On this used laptop the thermal compound was completely hard, which is one reason it was overheating.
- Clean the heatsink and the chips with alcohol and a cotton swab until the old paste is gone.
- A computer does not need thermal adhesive. A normal thermal paste is enough once everything is clean.
Step 9Unlock the CPU socket with a half turn
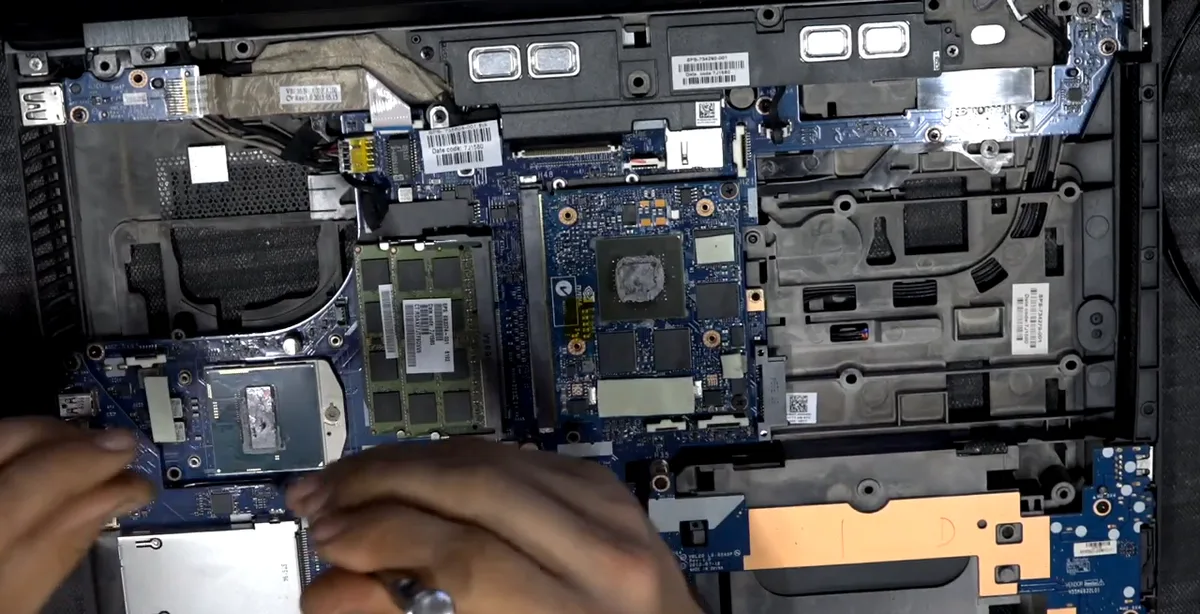
- The CPU socket has a lock screw. Turning it half a turn from one side to the other is enough to open or close it.
- Look at the small indicator next to the screw: it points to one side when open and the other side when closed.
- Which direction opens depends on the laptop. On this one, clockwise closes it.
Caution: Do not force the screw past its stop. If the processor does not lift freely, the socket is not fully open.
Step 10Swap the processor
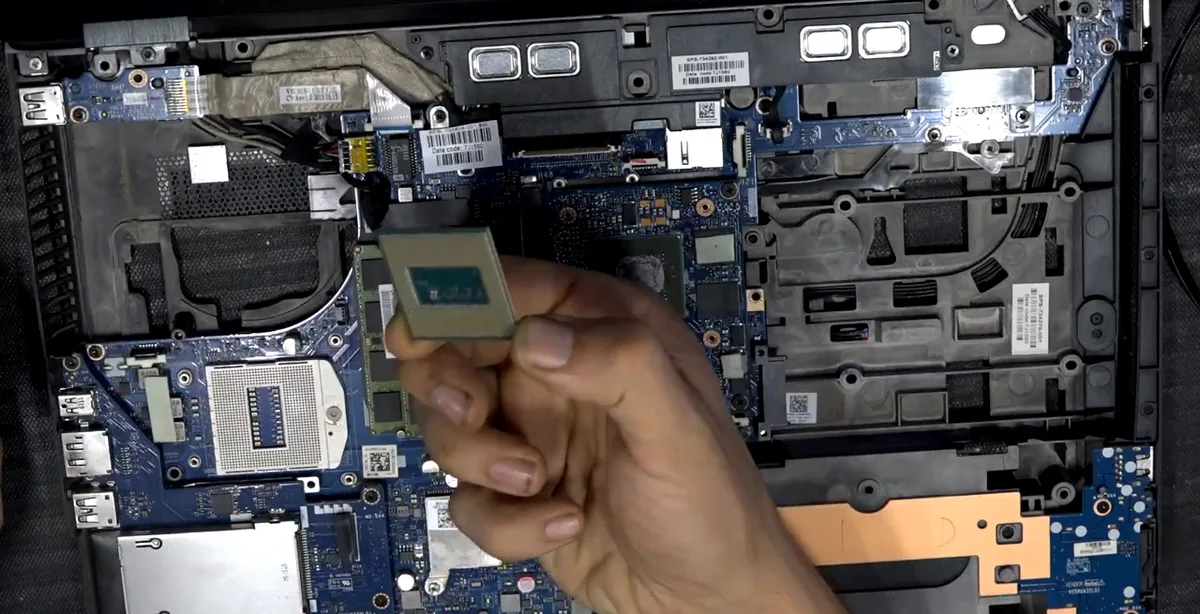
- Lift the old CPU straight out by its edges.
- Line up the new CPU with the socket (match the marked corner), drop it in without pushing, then turn the lock screw back to closed.
- Never touch the pins or contacts, and do not drop the chip: bent pins in a laptop socket are hard to fix.
Step 11Remove the two screws holding the MXM video card
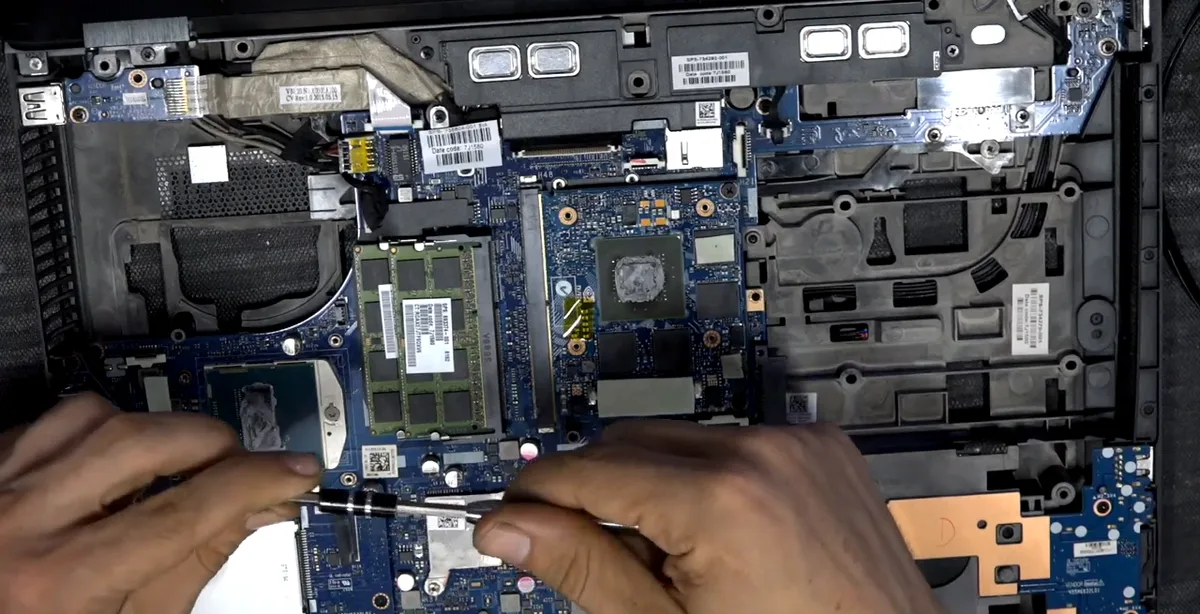
- Change the bit on your screwdriver to the correct Phillips size for these screws.
- On this laptop the video card is held by only two screws. Remove both.
- Watch out for the connector and any small cables near the card as you work.
Step 12Replace the MXM graphics card
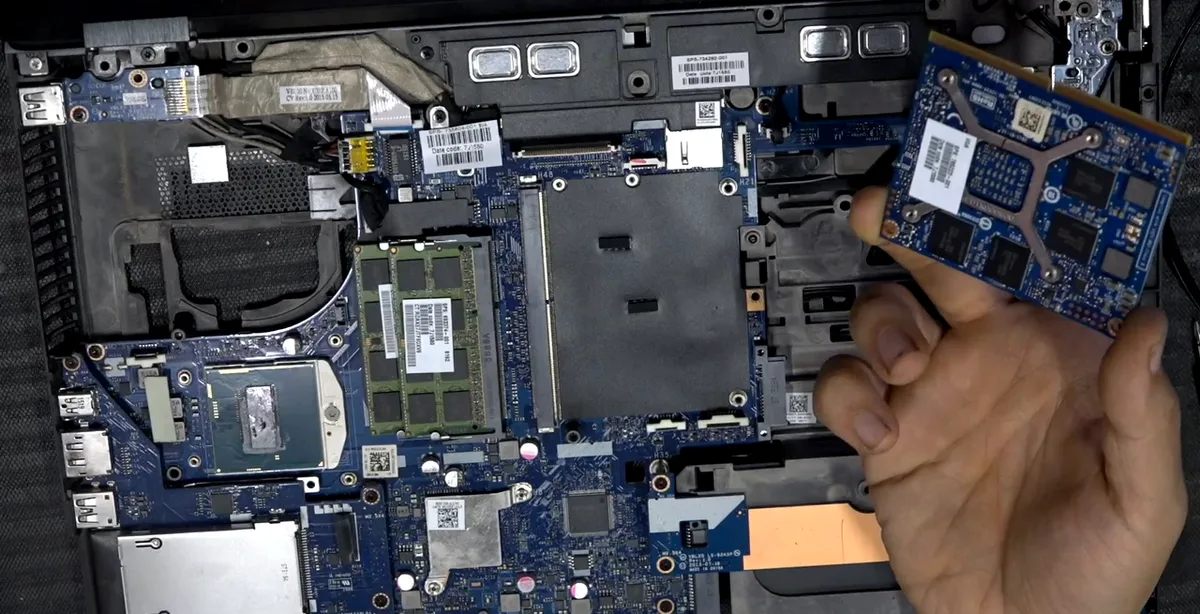
- Tilt the card up and slide it out of the MXM connector. This flat module is what a laptop video card looks like.
- Insert the new card at the same angle, make sure it is sitting right in the connector, press it down and put both screws back.
- Some cards need a different heatsink or thermal pads, so compare the new card's layout with the old one.
Step 13Apply thin thermal paste and reinstall the heatsink
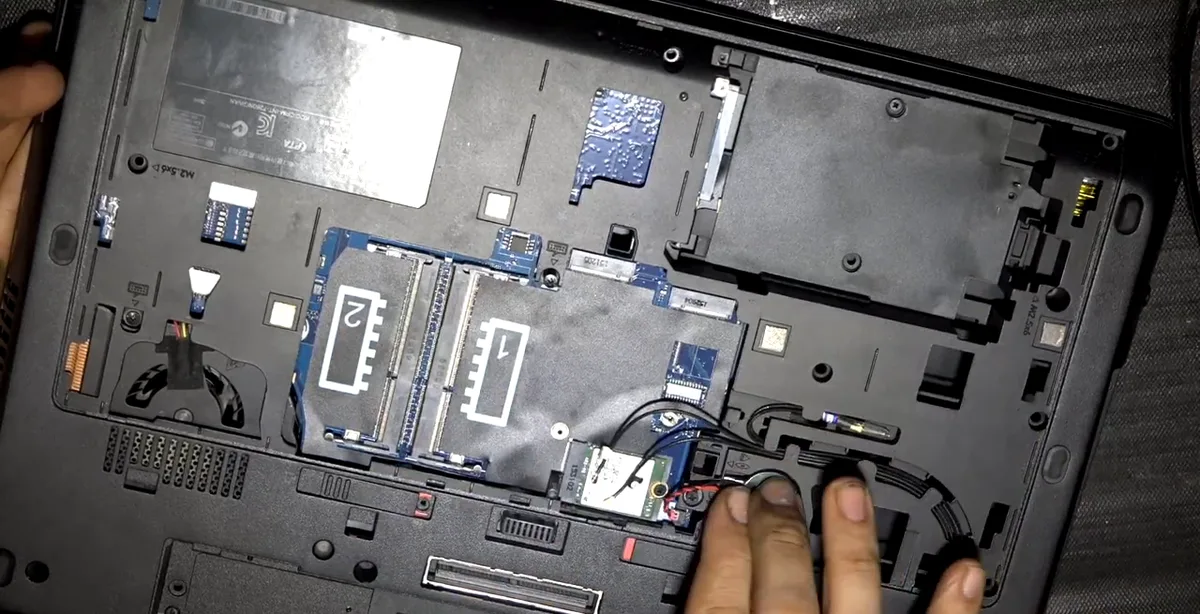
- Use a good thermal compound, and do not use a lot. As I say in the video, this is not peanut butter, you are not making a sandwich.
- Aim to just cover the surface of the chip. On another laptop I used too much, the temperature was not right, and after taking it apart and removing some paste it ran cooler.
- Put the heatsink screws back evenly, reconnect the fan, the keyboard cables and the keyboard.
Caution: Use non-conductive paste and keep it off the surrounding components.
Step 14Upgrade the RAM and storage while you are in there
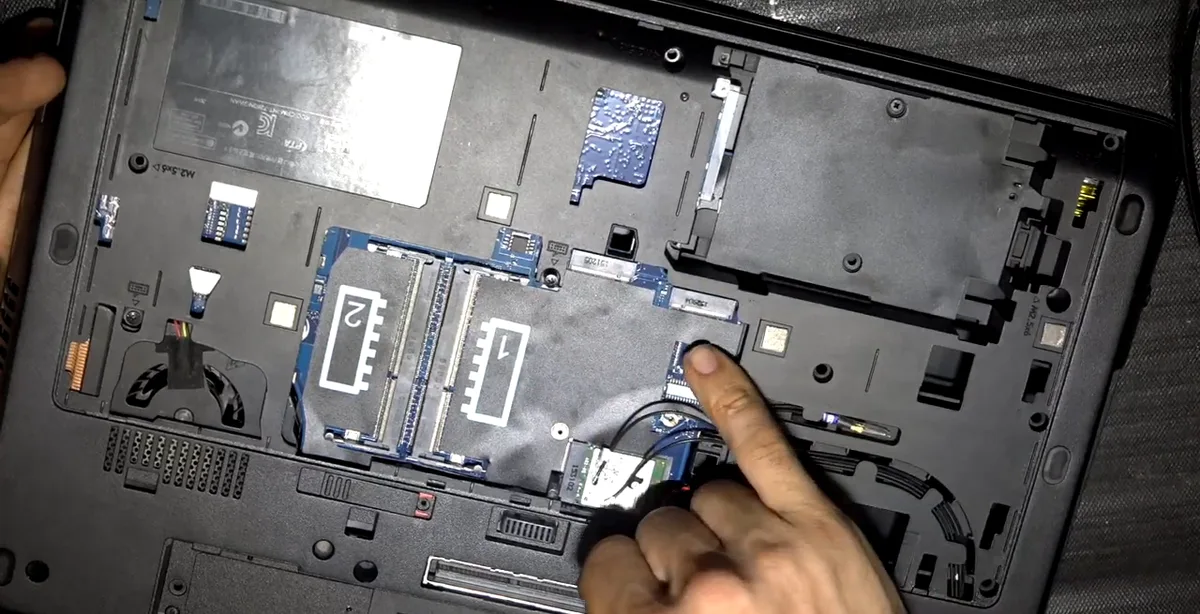
- These workstations have more expansion than a normal laptop: this one has two RAM sticks on one side and space for two more on the other.
- Some laptops like this can take 32 or 64 GB of RAM, depending on the model.
- There is also room for NVMe drives plus a SATA bay, so you can add storage too.
- Power on, check that the new CPU and GPU are detected, and watch the temperatures under load.
Why you can't upgrade the GPU or CPU on most laptops
Most laptops are built to be thin and cheap. The processor and graphics chip are soldered directly to the motherboard (BGA), so there is nothing to unscrew. In the video I say that on those laptops you can maybe upgrade the RAM and that is it.
Business mobile workstations were designed for service: the CPU sits in a socket with a lock screw, and the GPU is on an MXM card. That is why an older HP ZBook can take a different processor and video card, while a typical budget laptop cannot. If you have one of those budget laptops with other problems, read why I would not fix this HP 14 laptop with broken hinges before spending money on it.
Laptop GPU and CPU compatibility checklist
| Check | What to look for |
|---|---|
| CPU socket | Same socket as the original (the ZBook 17 G2 uses rPGA947 / Socket G3) |
| CPU support | Listed for your model in the maintenance and service guide or support forum reports |
| Video card | MXM module the manufacturer lists for your model |
| BIOS | Update the BIOS first; newer cards may need BIOS/VBIOS support |
| Heatsink | Fits the new card's layout and can handle the new chips' heat |
| Power | Charger and power delivery rated for the more powerful parts |
The exact list changes by model and generation, so use the service guide for your laptop, not a generic list.
The heatsink sets the limit
This is the part people forget. The heatsink you have is the one you are going to put back, unless you can find a better one of the same size for a more powerful CPU or GPU.
- Newer CPUs often draw less power and make less heat, so a newer chip may run fine on the old heatsink.
- A more powerful chip can produce more heat. If the heatsink cannot remove it, the laptop gets hot inside and starts throttling: it runs slower than it should.
- I compare it to the MacBook Pro with the i9, where many people complained about heat and throttling. Apple released a supplemental update for the 2018 models in July 2018 after reports of throttling.
Do your research on the CPU and GPU you want, and make sure they do not produce more heat than your heatsink can handle. Otherwise you are constrained by the heatsink.
Thermal paste: how much is enough
Too much paste is as bad as too little. In the video I explain that I once put on what I thought was enough, the temperatures on that MacBook Pro were not right, and after removing some paste the laptop ran cooler.
- Clean old paste completely with alcohol and a cotton swab.
- Apply a thin layer that just covers the surface of the chip.
- Use regular thermal paste, not thermal adhesive. I mention Arctic Silver and MX-4 (MX-4 is made by ARCTIC, a different company from Arctic Silver).
The same idea applies to desktops; see how I apply paste in installing an AMD Ryzen CPU and cooler on an AM4 motherboard.
Troubleshooting after a laptop GPU or CPU upgrade
| Symptom | Likely cause | What to try |
|---|---|---|
| No power or no display | Card not seated, unsupported GPU or CPU | Reseat the MXM card and CPU, confirm the CPU socket is closed, test with the original parts |
| Laptop gets hot and slow | Too much or too little paste, heatsink not tight, chip too powerful | Reapply paste thinly, tighten screws evenly, check the CPU power rating |
| Keyboard does not work | Ribbon cable not fully inserted | Reopen and reseat both keyboard cables |
| Fan runs loud constantly | Fan cable unplugged or dirty heatsink | Reconnect the fan and clean the fins |
| GPU not detected in Windows | Driver or BIOS support | Install the correct driver and update the BIOS |
Tips before you buy parts
- Write down the exact model and generation of your laptop (for example ZBook 15 or 17 and G1, G2 and so on).
- Look for used upgrade parts from the same laptop family; that is usually the safest match.
- Upgrade the cheap things too: RAM, NVMe and SATA storage. If you are choosing a drive, see cheap SSD vs expensive SSD.
- Keep the original CPU and GPU until you confirm the new parts work.
Frequently asked questions
Can you upgrade the GPU in a laptop?
Only on laptops that use a removable MXM graphics card, such as many business mobile workstations like the HP ZBook. On most laptops the graphics chip is soldered to the motherboard and cannot be replaced.
Can I replace my laptop CPU?
Yes, if the laptop has a socketed processor. On the HP ZBook in the video the CPU sits in a socket with a lock screw that you turn half a turn to release it. Most modern thin laptops have soldered CPUs that cannot be swapped.
What is an MXM graphics card?
MXM is a module format for laptop graphics cards. It is a small flat card held by screws, very different from a desktop PCIe card. Desktop video cards do not fit in laptops.
How do I know if my laptop CPU is soldered or socketed?
Check the maintenance and service guide or specifications for your model. If the processor is listed as a replaceable part with a socket type such as rPGA947, it is socketed. If it is BGA, it is soldered.
Will a more powerful CPU or GPU overheat my laptop?
It can. You usually keep the same heatsink, so a chip that produces more heat than the heatsink can handle will make the laptop throttle and run slower. Check the power rating of the new part.
How much thermal paste should I use on a laptop CPU?
Just enough to cover the surface of the chip in a thin layer. Too much paste can make temperatures worse. Clean the old paste with alcohol first.
Do I need anti-static protection to upgrade a laptop?
Yes. Use anti-static gloves or a wrist strap, or make sure you have no static charge on your body before touching the motherboard.
Can I add more RAM to an HP ZBook?
The HP ZBook in the video has two RAM sticks on one side and space for two more on the other. Some laptops like this can take 32 or 64 GB, depending on the model, so check your model's maximum in the service guide.
Watch the video


Comments
Comments appear after Gabriel reviews them.
Loading comments…