

Step-by-step guide
How to install Visual Studio Code on Windows and set it up for Python
Short answer: to install Visual Studio Code on Windows, download the free installer from code.visualstudio.com, accept the license, tick Add to PATH (and a desktop icon if you want one) and click Install. Then open the Extensions view with Ctrl+Shift+X, search for Python and install Microsoft's extension. After that you can create a new Python file and start typing code.
VS Code is a text editor for many programming languages, and for Python it is a great place to start: it helps you find errors quicker and completes code as you type. In this lesson from my 2021 Python course I install it on Windows, add the Python extension and type a first print() line. Below you get each step with a screenshot, plus the part beginners often miss: VS Code and its extension do not include Python itself, so you also need a Python interpreter to run what you write.
In this article
- Go to the Visual Studio Code website
- Pick the Windows download (or another system)
- Run the installer and accept the agreement
- Tick Add to PATH and Create a desktop icon
- Click Install and launch VS Code
- Open the Extensions view (Ctrl+Shift+X) and search for Python
- Install Microsoft's Python extension
- Open a folder or start a new file
- Choose Python as the language of the new file
- Type your first line: print()
- Let VS Code close parentheses and quotes for you
- Save the file
- Use the Edit menu: undo, redo, copy, paste, find
- Install the Python interpreter (VS Code doesn't include it)
- Run your first Python file in VS Code
- User setup vs System setup vs ZIP: which VS Code installer?
- Troubleshooting a VS Code install on Windows
- Useful VS Code shortcuts for Python beginners
- What to do next
- Frequently asked questions
- Watch the video
Step 1Go to the Visual Studio Code website
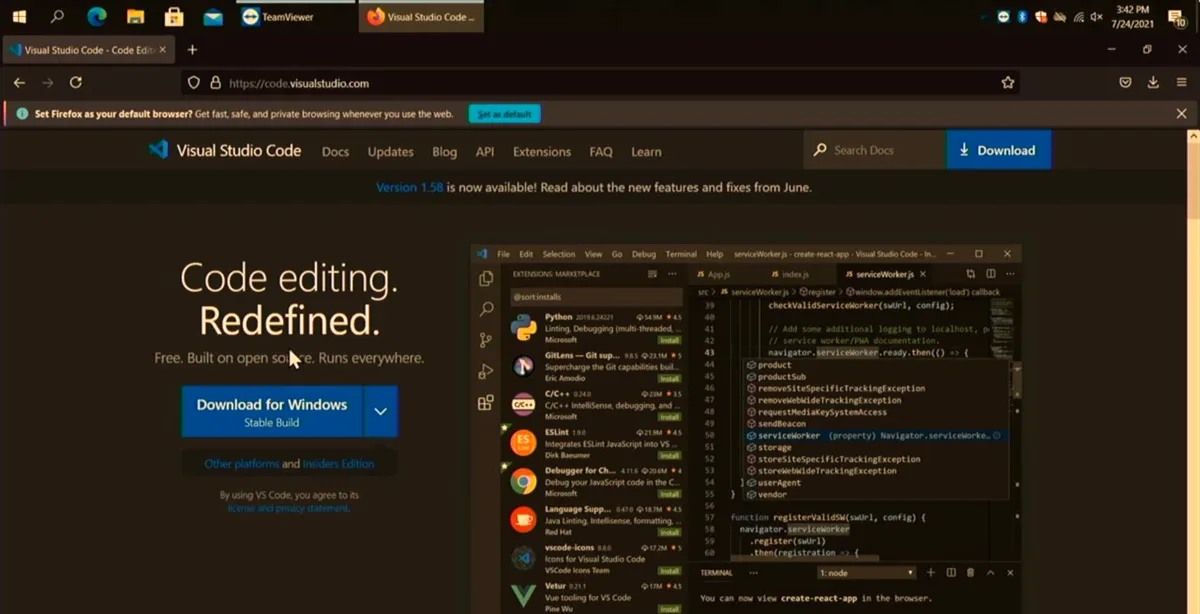
- Open your browser and go to code.visualstudio.com, or simply search for Visual Studio Code.
- The site detects your system and shows a Download for Windows button. VS Code is free and built on open source.
- Common mistake: downloading Visual Studio (the big IDE) instead of Visual Studio Code. They are different products; for this course you want the lightweight editor.
Note: Only download from the official site. Third-party download pages sometimes bundle unwanted software.
Step 2Pick the Windows download (or another system)
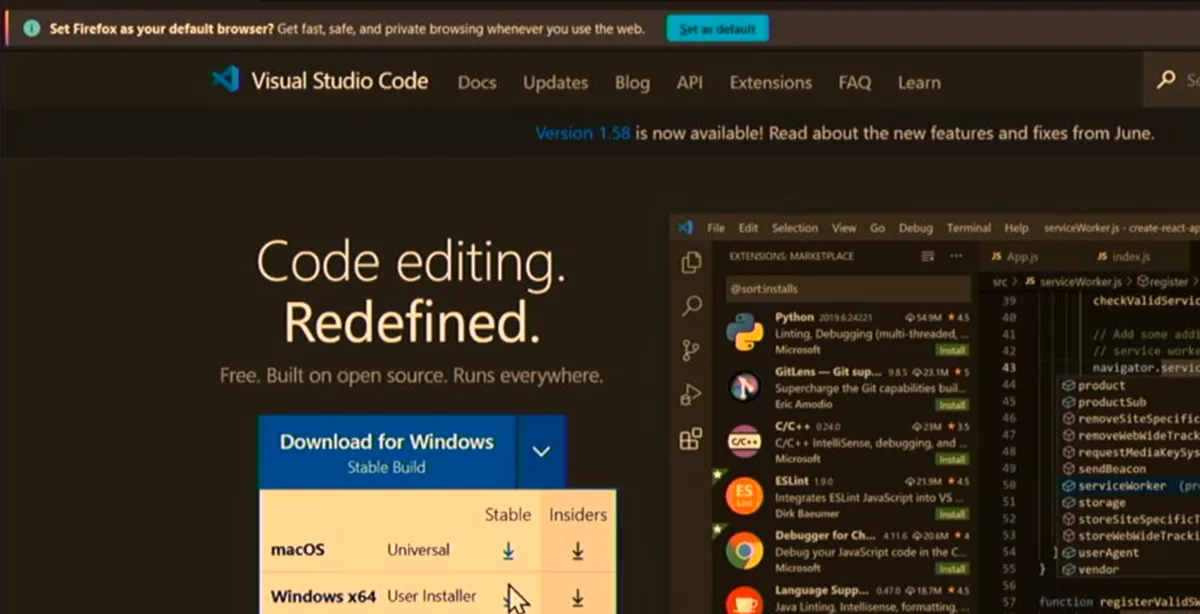
- Click the small arrow next to the download button to see other operating systems: macOS, Windows and Linux builds.
- For this guide choose Windows. The download is the User Installer (
VSCodeUserSetup-{version}.exe). - Pick the Stable build. Insiders is a preview version with daily changes, not what a beginner needs.
- Tip: if you already downloaded it before (like I had in the video), just open the file from your Downloads folder.
Step 3Run the installer and accept the agreement
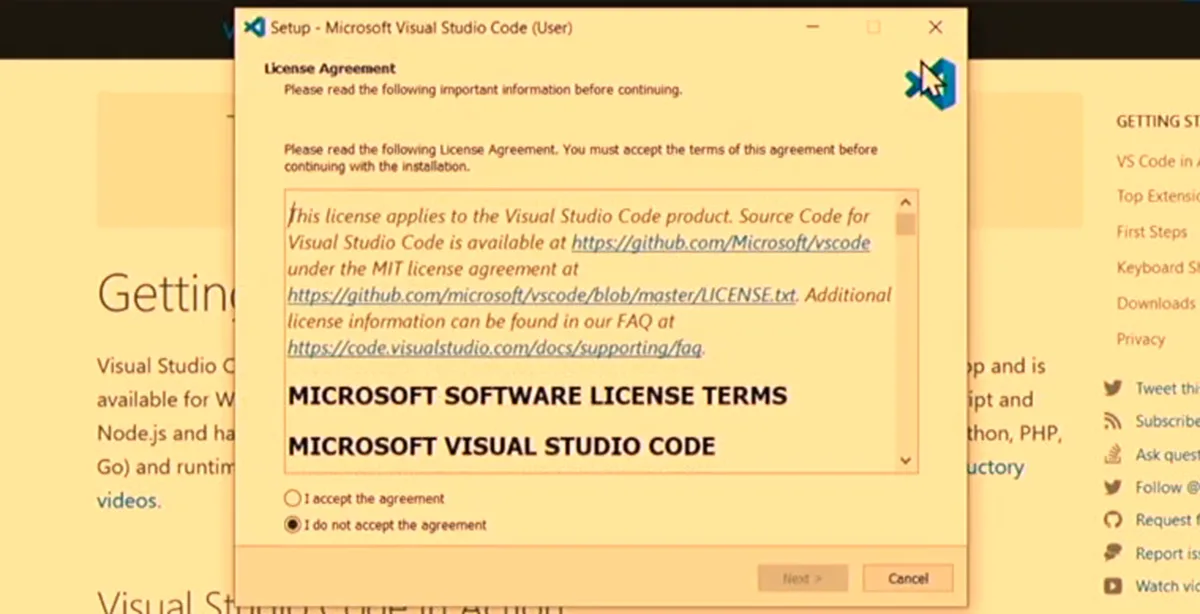
- Double-click the installer. The window title says Setup - Microsoft Visual Studio Code (User).
- Select I accept the agreement and click Next.
- On the next pages you can keep the default folder and Start Menu folder and just click Next.
- Why User setup: Microsoft recommends it for most people because it does not need administrator rights and updates smoothly in the background.
Step 4Tick Add to PATH and Create a desktop icon
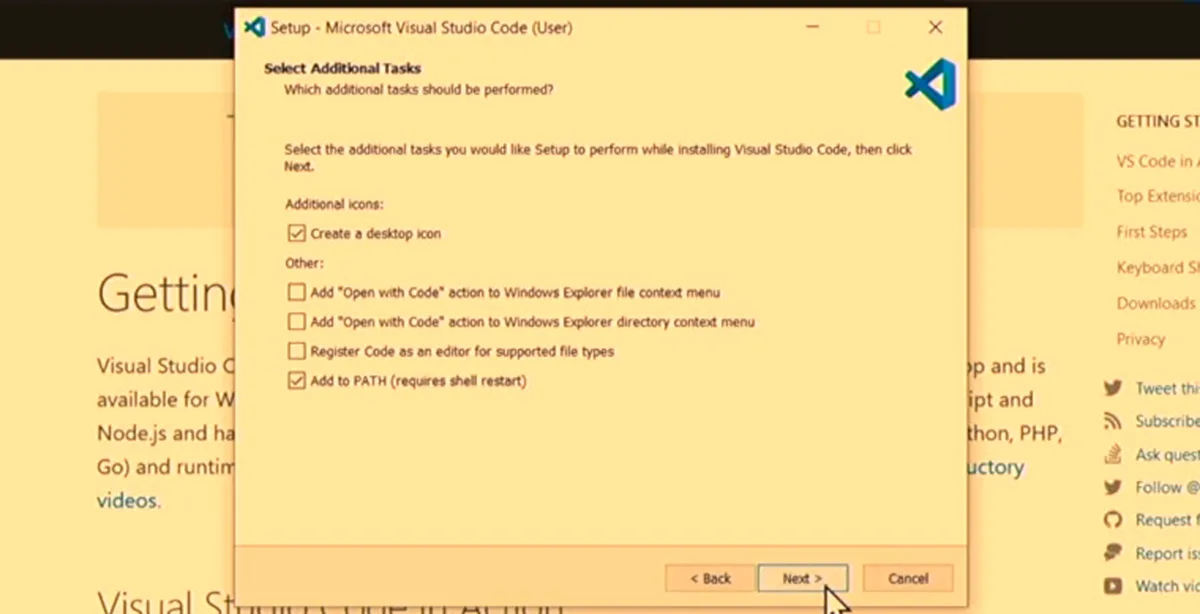
- On Select Additional Tasks, make sure Add to PATH (requires shell restart) is checked. This lets you open VS Code by typing
codein a terminal. - Also tick Create a desktop icon so you have it on your desktop ready to use.
- The "Open with Code" options for the right-click menu are optional; they are handy for opening a project folder from File Explorer.
- Common mistake: leaving Add to PATH unchecked and later getting "'code' is not recognized" in the terminal.
Note: "Requires shell restart" means any Command Prompt or PowerShell window that was already open will not see the change. Close it and open a new one after installing.
Step 5Click Install and launch VS Code
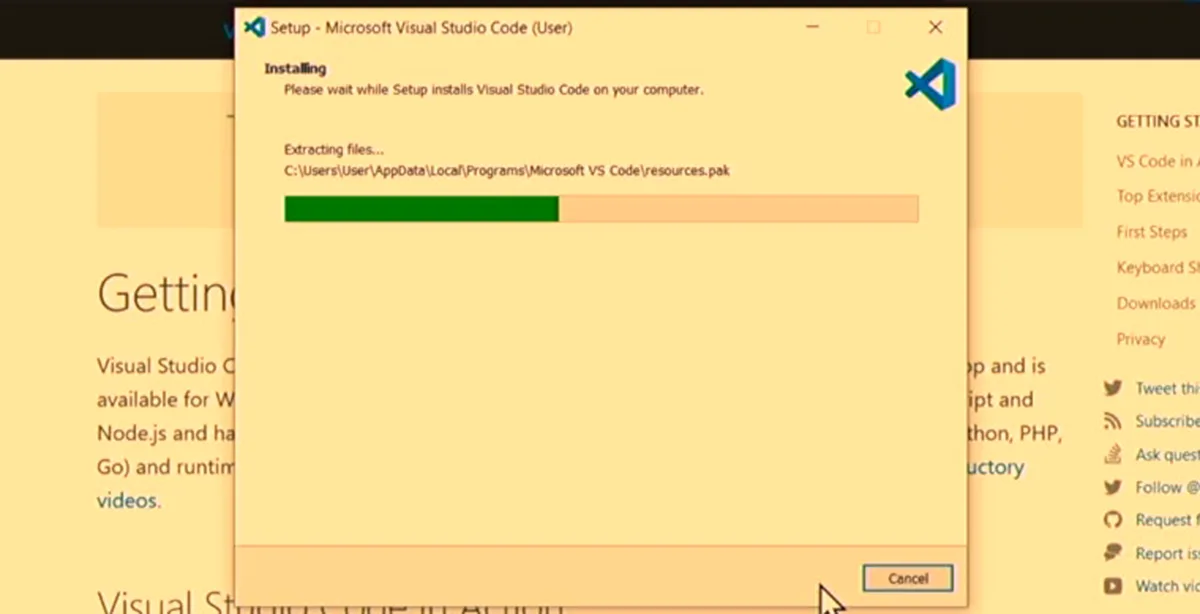
- Click Install and wait for the progress bar. It only takes a moment on most PCs.
- The User setup installs into
C:\Users\{your-name}\AppData\Local\Programs\Microsoft VS Code, so it doesn't touch other users on the computer. - At the end leave Launch Visual Studio Code checked and click Finish.
- Tip: to confirm the PATH setting worked, open a new terminal and run
code --version.
Step 6Open the Extensions view (Ctrl+Shift+X) and search for Python
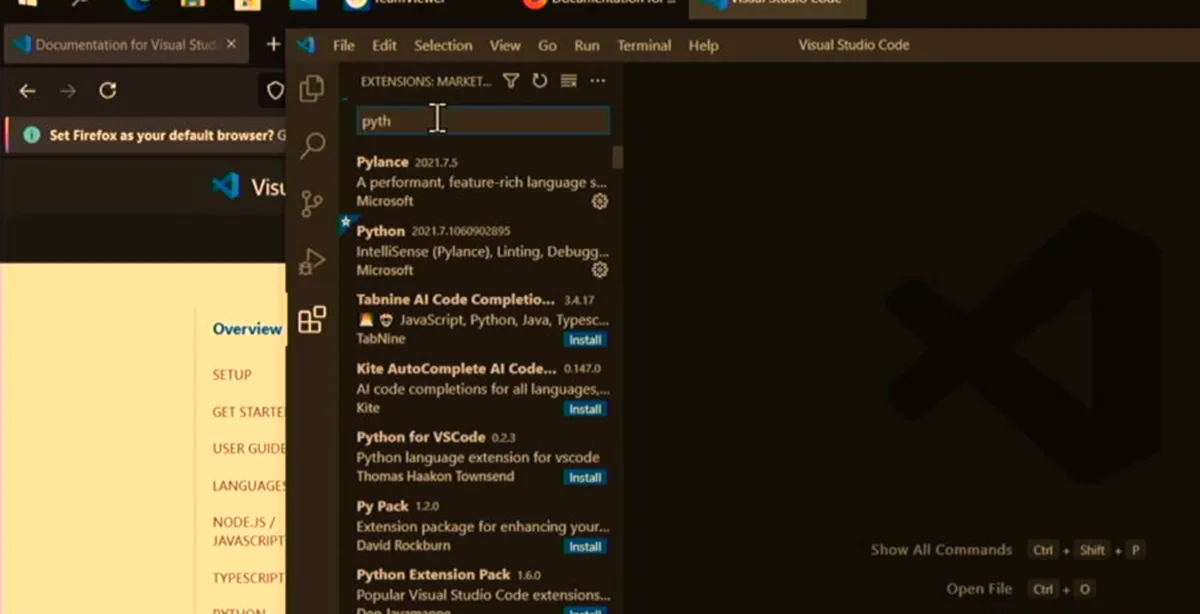
- VS Code is just a text editor for many languages; extensions add support for each one. For Python you need the Python extension.
- Click the Extensions icon in the left bar. If you hover over it, it shows the shortcut Ctrl+Shift+X, which opens the same view.
- Type python in the search box at the top.
- Common mistake: installing a random extension with "Python" in its name. Look for the one published by Microsoft.
Step 7Install Microsoft's Python extension
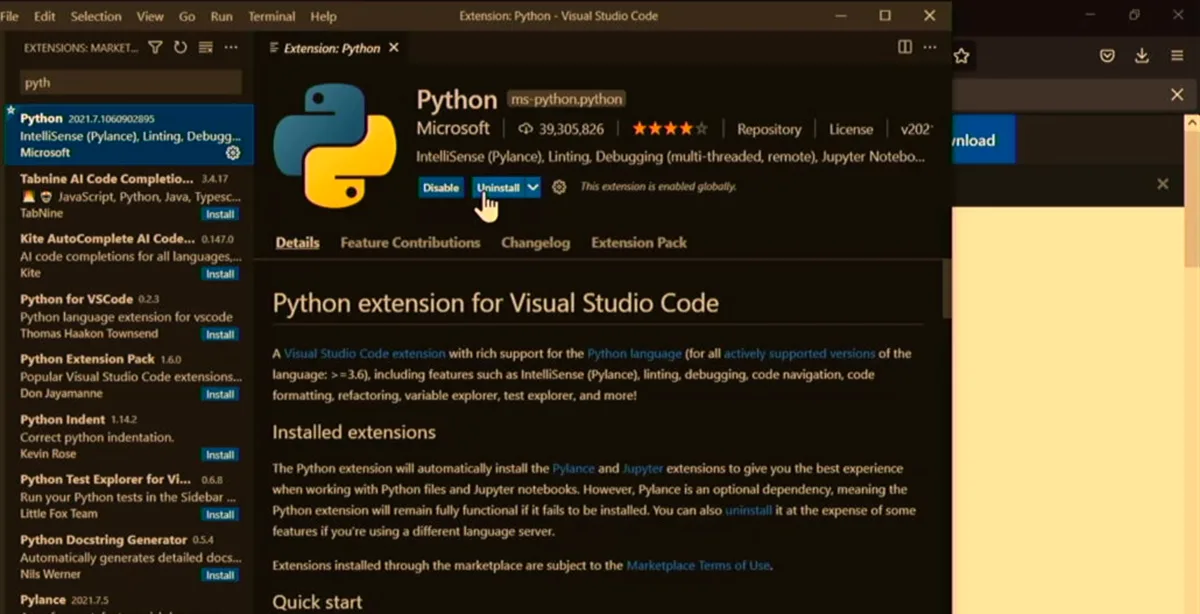
- Select Python by Microsoft and click Install. (In the video it shows as already installed because I had used it for another lesson.)
- The extension adds Python IntelliSense (smart completion), linting, running and debugging.
- Today it also installs helper extensions automatically, such as Pylance and the Python Debugger. You don't need to install those one by one.
- No restart is needed; the extension is active right away.
Step 8Open a folder or start a new file
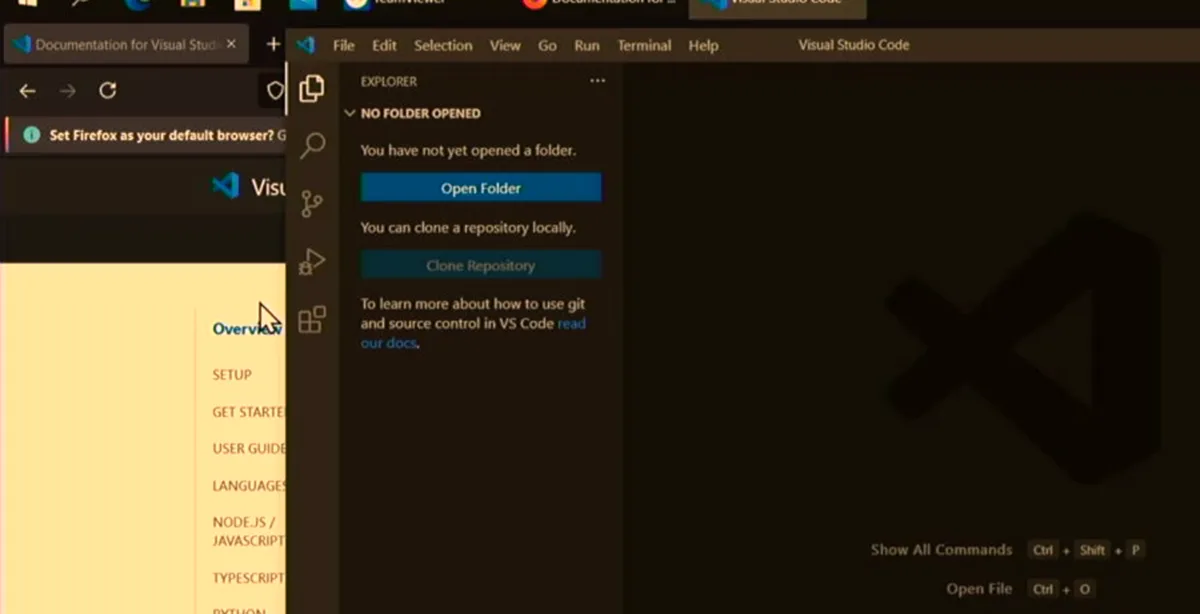
- Click the Explorer icon (top of the left bar). If you already have Python files, click Open Folder and pick the folder that contains them.
- If you want to start new, create a new file instead (on the Welcome page, or File > New File / New Text File).
- Why a folder helps: when you open a folder, VS Code treats it as your workspace, and all your course exercises stay together.
- Tip: make one folder per course or project, for example
Documents\python-course.
Step 9Choose Python as the language of the new file
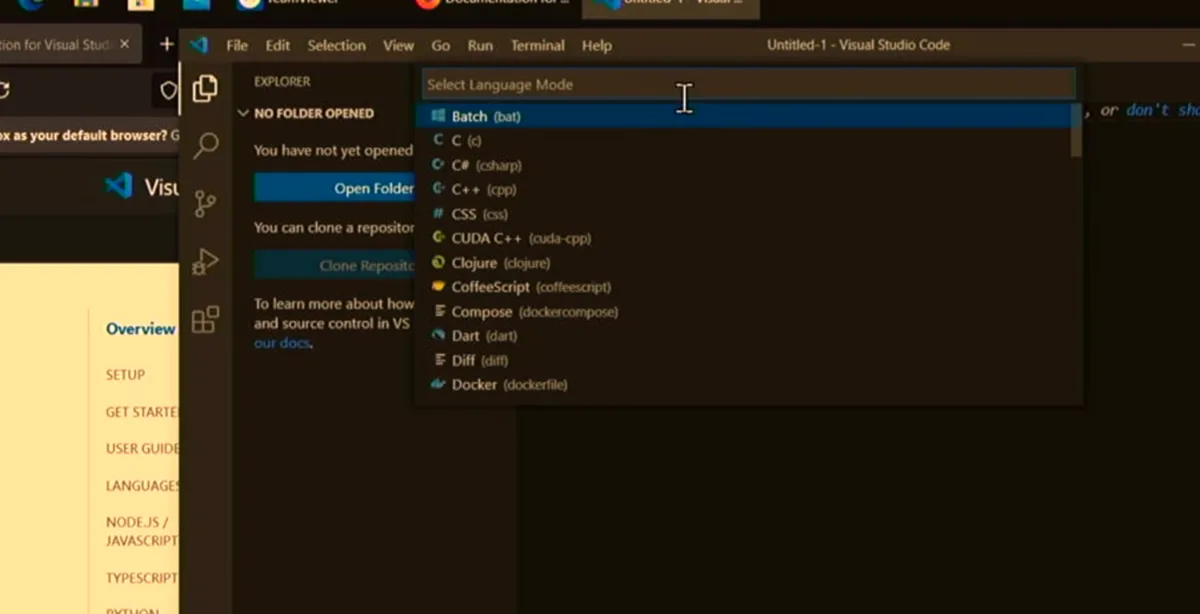
- A new file starts as plain text. Click Select a language (or the language name in the bottom-right status bar).
- Type python and pick the first result, Python.
- Now VS Code knows it's Python code, so the extension can color it, complete it and check it.
- Common mistake: typing code in a plain-text file. You won't get any suggestions until the language is Python (or the file is saved with a
.pyname).
Step 10Type your first line: print()
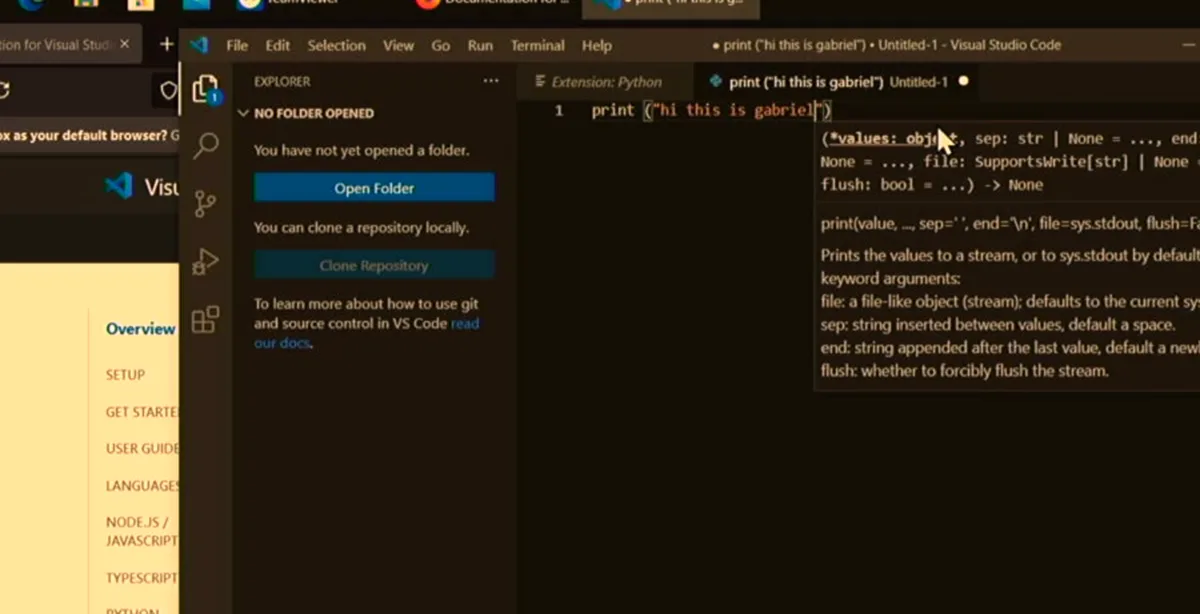
- Type
print. As soon as you start, VS Code suggests the function and shows a tooltip with its parameters and what it does. - Open the parenthesis and type your message in quotes. In the video I typed
print("hi this is gabriel"). - This tooltip is a big help while learning: you see how a function works without leaving the editor.
- Tip: press Tab or Enter to accept a suggestion instead of typing the whole word.
Step 11Let VS Code close parentheses and quotes for you
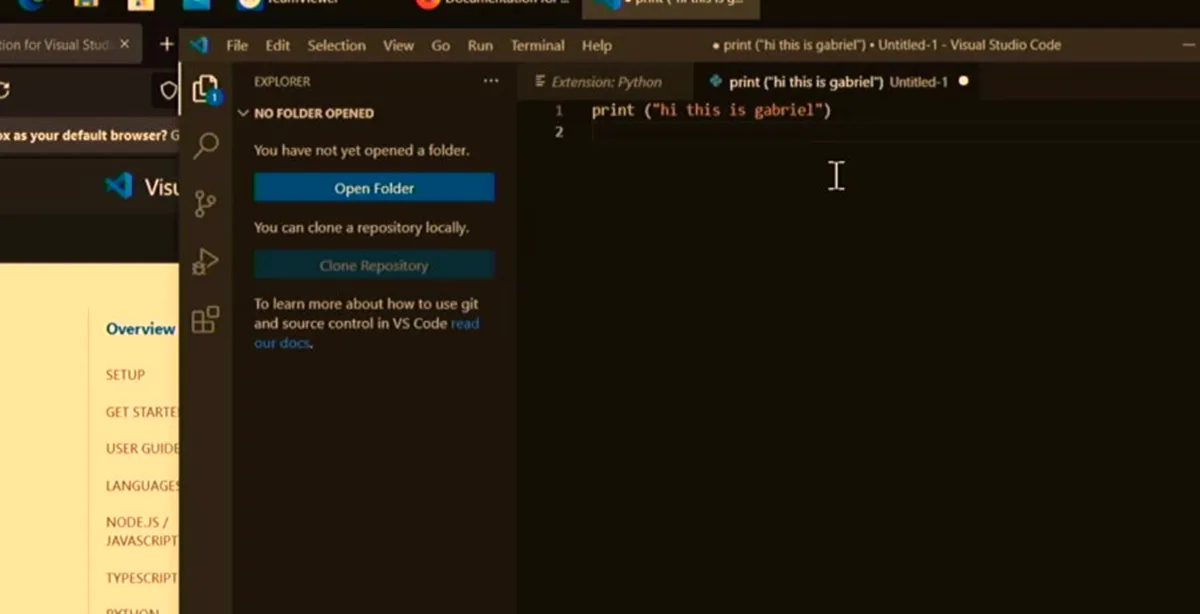
- When you open a parenthesis or a quote, VS Code adds the closing one automatically. In the video all the quotation marks and the closing parenthesis were typed by the system.
- That avoids one of the most common beginner errors: a missing
)or"that makes the whole line fail. - If you type the closing character yourself, VS Code just steps over it, so you don't end up with two.
Step 12Save the file
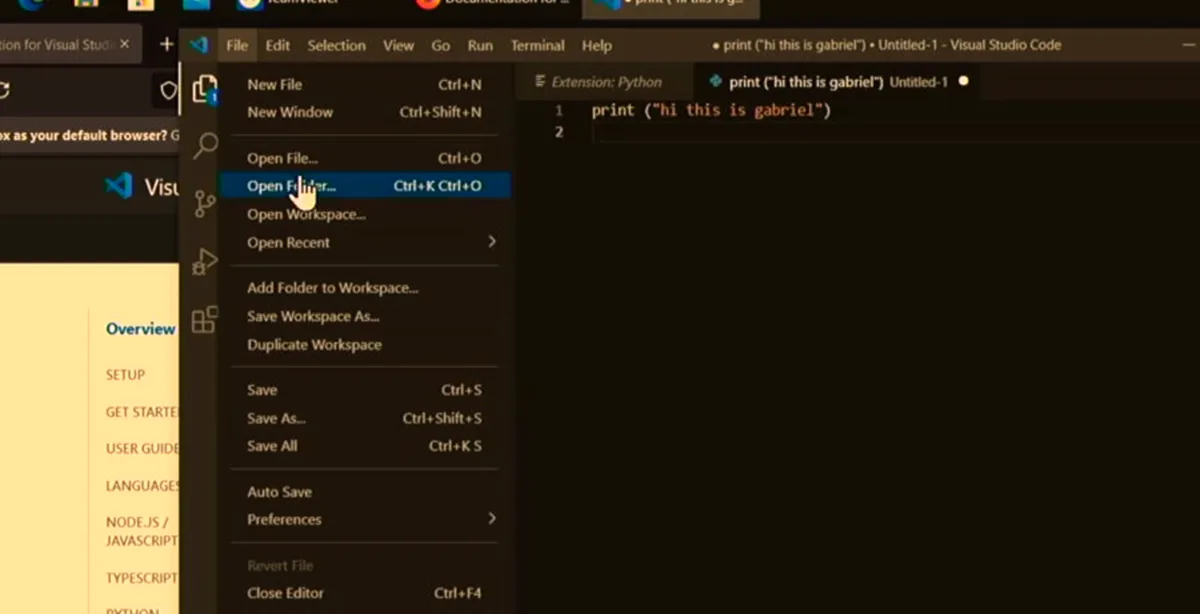
- Open File > Save (or press Ctrl+S). Give the file a name ending in .py, for example
hello.py. - The
.pyextension tells VS Code (and Python) that this is a Python program. - To make another file, create a new one the same way; it works like a document in a word processor.
- Common mistake: closing VS Code with an unsaved "Untitled" tab and losing your exercise.
Step 13Use the Edit menu: undo, redo, copy, paste, find
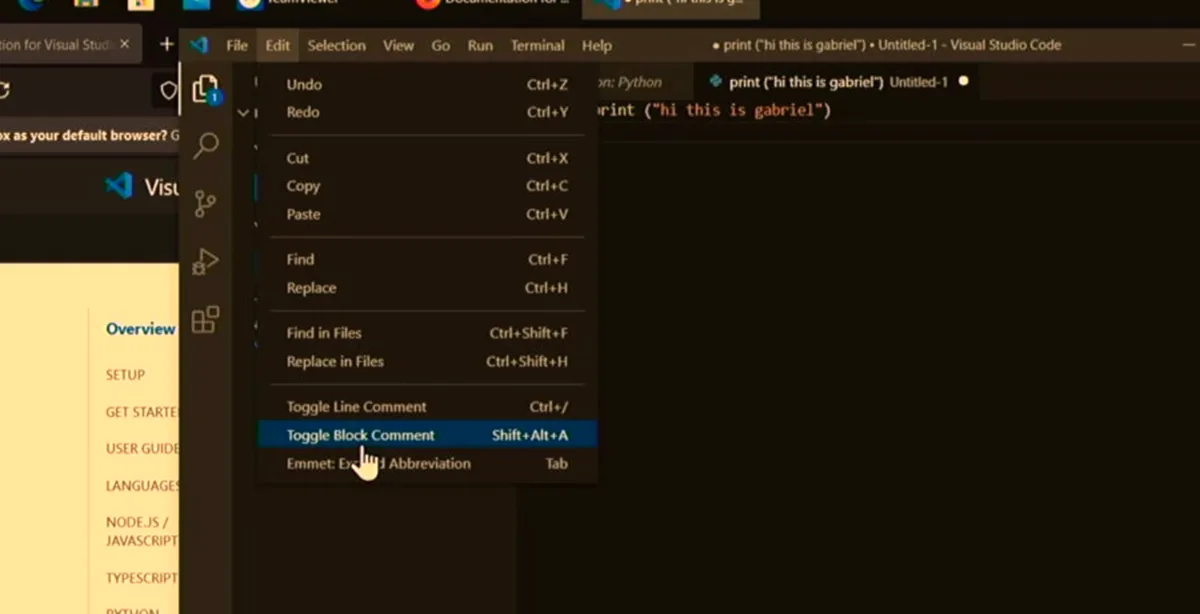
- The Edit menu has the same features you know from a word document: Undo (Ctrl+Z), Redo (Ctrl+Y), Cut, Copy, Paste, Find (Ctrl+F) and Replace (Ctrl+H).
- It also has programmer tools like Find in Files (search the whole folder) and Toggle Line Comment (Ctrl+/).
- That's the basic setup done: you have a free super text editor ready for the rest of the Python lessons.
Install the Python interpreter (VS Code doesn't include it)
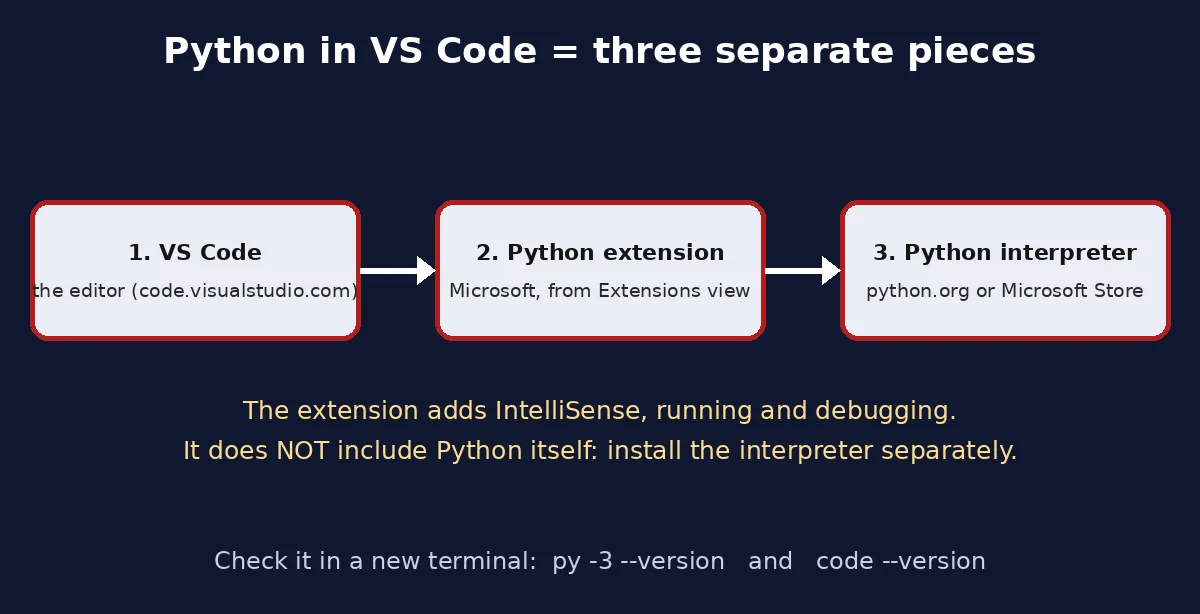
This is the part that confuses many beginners. Running Python in VS Code takes three separate pieces:
- VS Code, the editor where you write code.
- The Python extension, which connects VS Code to Python (IntelliSense, running, debugging).
- A Python interpreter, the program that actually runs your code. Microsoft's documentation is clear that the extension does not include Python itself.
In the video the status bar already shows a Python 3.9 interpreter from the Microsoft Store, because I installed Python in an earlier lesson. If your PC doesn't have it yet, install Python 3 from python.org (the first Download Python button), or from the Microsoft Store if you don't have admin rights.
To check it worked, open a new Command Prompt and run py -3 --version. If you install Python while VS Code is open, close and reopen VS Code (or at least its terminal) so it finds the new interpreter.
Run your first Python file in VS Code
The video stops after typing and saving the first line. When you're ready to run it, Microsoft's Python tutorial describes these options (with the Python extension and an interpreter installed):
- Click the Run Python File play button at the top right of the editor. It opens a terminal and runs
python hello.py. - Right-click in the editor and choose Run Python > Run Python File in Terminal.
- Select a line and press Shift+Enter to send just that line to a Python terminal.
If VS Code asks which interpreter to use, open the Command Palette with Ctrl+Shift+P and run Python: Select Interpreter.
Note: save the file with a .py name first. An untitled tab may not offer the Run Python File button.
User setup vs System setup vs ZIP: which VS Code installer?
| Installer | Admin rights | Installs to | Best for |
|---|---|---|---|
| User setup (used in the video) | Not needed | %LOCALAPPDATA%\Programs\Microsoft VS Code | Most people; smoothest updates |
| System setup | Required | Program Files | Making VS Code available to all users on one PC |
| ZIP archive | Not needed | Any folder you extract it to | Portable use; you update it manually |
One detail from Microsoft's docs: with the User setup, updates are disabled if you run VS Code as Administrator, so open it normally.
Troubleshooting a VS Code install on Windows
| Problem | Likely cause | Fix |
|---|---|---|
'code' is not recognized in the terminal | Old terminal window, or Add to PATH was not ticked | Open a new terminal; if it still fails, run the installer again and tick Add to PATH |
No suggestions when typing print | File is plain text, or the Python extension is not installed | Select Python as the language or save as .py; install the Microsoft Python extension |
| "Python is not installed" / no interpreter found | Only the extension was installed | Install Python 3 from python.org or the Microsoft Store, then restart VS Code |
| Wrong Python version runs | More than one interpreter on the PC | Ctrl+Shift+P > Python: Select Interpreter |
| VS Code won't update | Running a User setup as Administrator | Start VS Code normally (not "Run as administrator") |
If your Windows PC is slow while installing or coding, check how to turn off Windows efficiency mode, and if you suspect the PC itself is infected, see how to remove viruses, spyware and trojans before installing developer tools.
Useful VS Code shortcuts for Python beginners
| Shortcut | What it does |
|---|---|
| Ctrl+Shift+X | Open the Extensions view (shown in the video) |
| Ctrl+Shift+P | Command Palette: run any command by name |
| Ctrl+S | Save the file |
| Ctrl+Z / Ctrl+Y | Undo / redo |
| Ctrl+F / Ctrl+H | Find / replace in the file |
| Ctrl+Shift+F | Find in all files of the folder |
| Ctrl+/ | Comment or uncomment the current line |
The Edit-menu shortcuts above are the ones shown in the video's Edit menu. Using a Mac instead? The same editor runs on macOS, and if you need Windows-only tools there, see how to install Windows 11 on an M1 Mac with Parallels.
What to do next
- Make a folder for the course and open it with File > Open Folder.
- Install Python if you haven't, then run your
hello.pywith the play button. - Change the message inside
print()and run it again; small experiments are the fastest way to learn. - Keep VS Code updated: it ships updates regularly and asks you to install them.
Frequently asked questions
Is Visual Studio Code free?
Yes. VS Code is a free editor from Microsoft, built on open source, and runs on Windows, macOS and Linux.
Is Visual Studio Code the same as Visual Studio?
No. Visual Studio is a large IDE; Visual Studio Code is a lightweight code editor that you extend with extensions, like the Python extension in this guide.
Does VS Code come with Python?
No. You install a Python interpreter separately (python.org or the Microsoft Store). The Python extension connects VS Code to that interpreter.
What does Add to PATH do in the VS Code installer?
It lets you start VS Code from a terminal by typing code (for example code . to open the current folder). It only works in terminal windows opened after the install.
Do I need administrator rights to install VS Code?
Not with the User setup, which Microsoft recommends for most people. The System setup for all users needs admin rights.
Which Python extension should I install in VS Code?
The one named Python published by Microsoft. It adds IntelliSense, linting and debugging, and installs helpers such as Pylance and the Python Debugger.
How do I open the Extensions view in VS Code?
Click the Extensions icon in the left bar or press Ctrl+Shift+X.
Why doesn't VS Code suggest code when I type?
The file is probably still plain text. Select Python as the language (or save the file as .py) and make sure the Python extension is installed.
Watch the video


Comments
Comments appear after Gabriel reviews them.
Loading comments…