

Step-by-step guide
How to set a fixed IP for every device on a UniFi network (and keep DHCP for new ones)
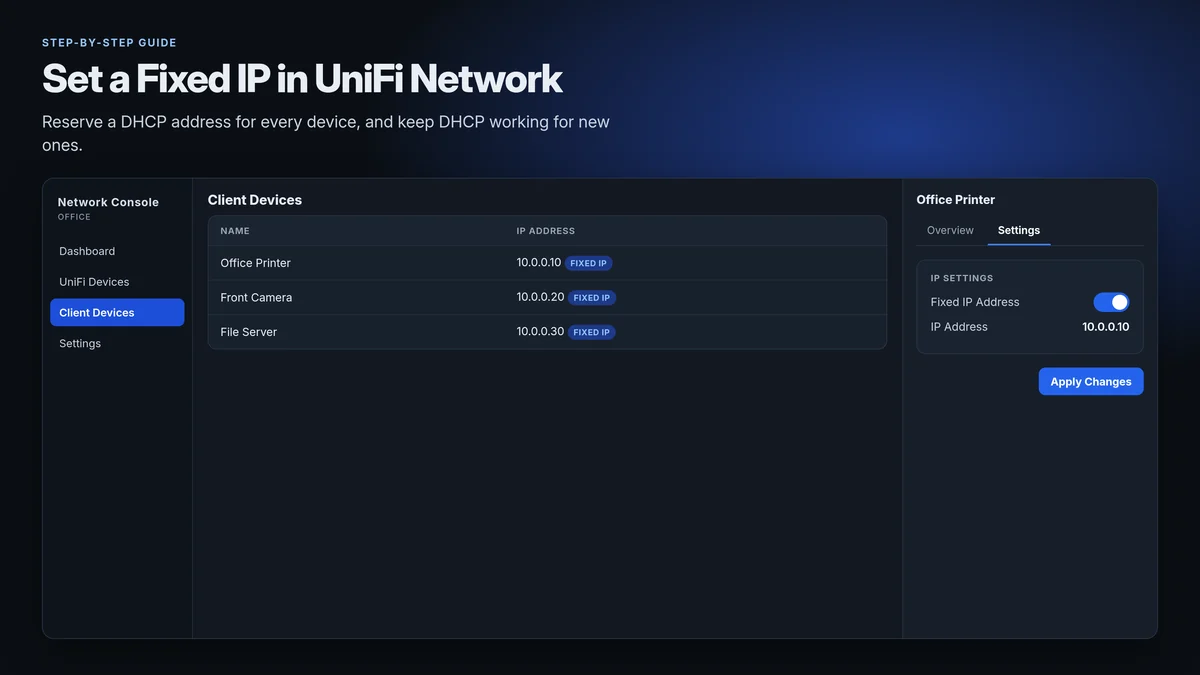
If a printer, camera, NAS, or desktop on your UniFi network sometimes changes address, that is normal. The UniFi gateway runs a DHCP server that hands out IP addresses automatically, so a device may get a new one the next time it reconnects. Then a port forward, a printer bookmark, or a camera app can break.
You do not have to type a static address on every device. In UniFi Network you turn on Fixed IP Address for each client. Official UniFi help describes this as a DHCP reservation: the gateway always offers the same address to that device's MAC address, while the device itself stays on DHCP. New devices that you have not reserved still get an address from the DHCP Range.
This beginner guide shows you how to open the UniFi console, reserve each device's current IP so nothing has to change, and then check Settings > Networks > Default > DHCP Range so phones, guests, and anything new still get an automatic address. Menus match current official wording in the Ubiquiti Help Center; version differences are noted after the steps.
In this article
- Open the UniFi console
- Open Client Devices in the left sidebar
- Click a device, then open the Settings tab
- Turn on Fixed IP Address and keep the current IP
- Apply Changes, then repeat for each device
- Check Settings > Networks > Default > DHCP Range
- Fixed IP vs static IP, and labels that change by version
- Tip: the official UniFi Network API cannot set Fixed IPs yet
- Related UniFi and network guides
- Frequently asked questions
Step 1Open the UniFi console
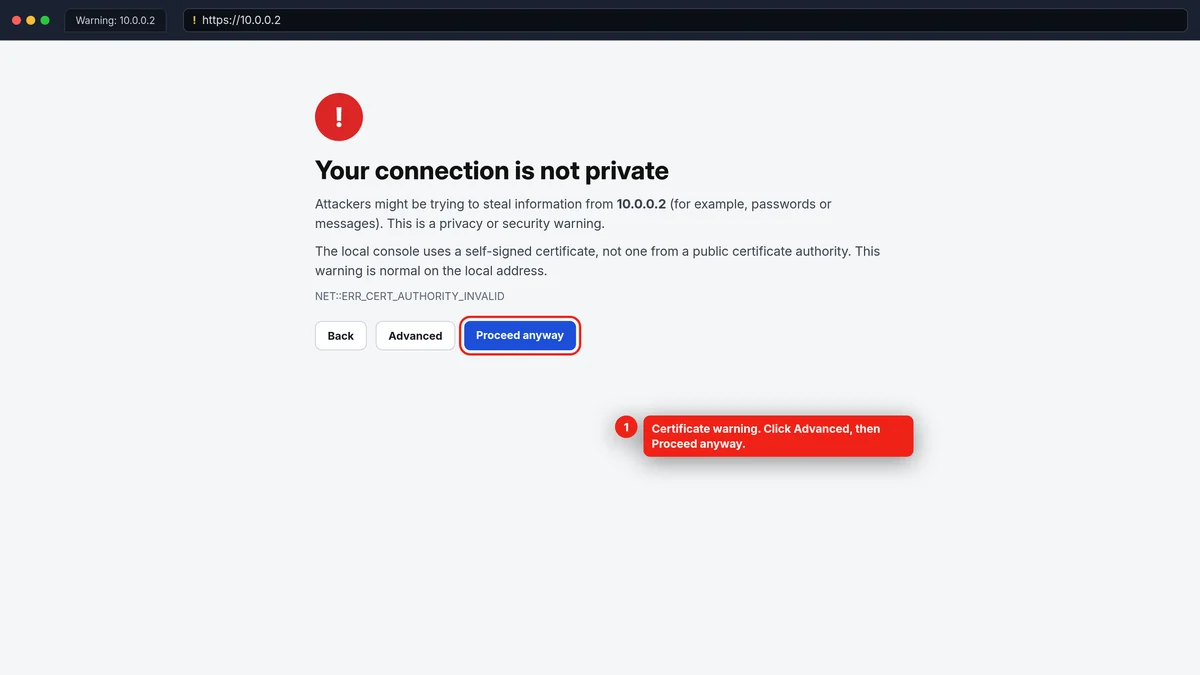
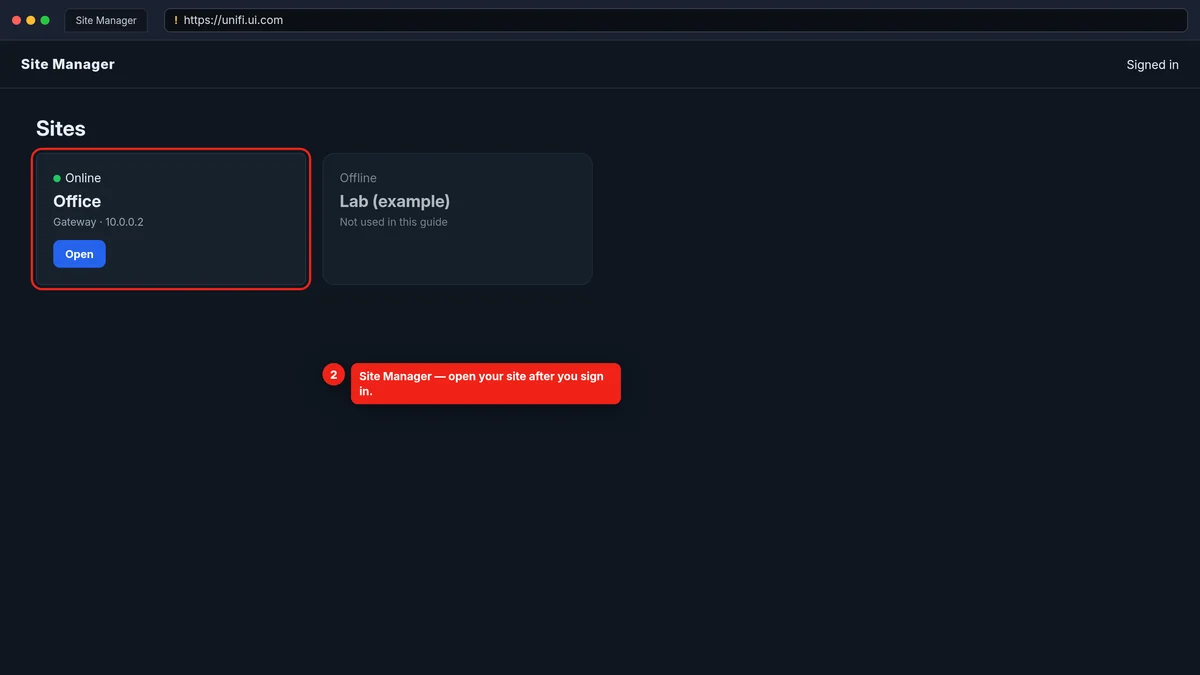
You can manage UniFi on the local network or from the cloud. Local access works even if the internet is down.
Option A — on the local network
- Connect your computer or phone to the same LAN or Wi-Fi as the UniFi gateway.
- Open a browser and go to
https://plus the gateway's IP address. A common example ishttps://10.0.0.2. Yours may behttps://192.168.1.1or whatever was set during setup. - If you do not know that IP, check the console's LCD screen if it has one. Official setup help also says Cloud Gateways can be opened by typing
unifi/in the browser while you are on the LAN. You can also use Discovery in the WiFiman mobile app. - You will almost always see a privacy or security warning. Official UniFi setup help says this is normal and that you should proceed anyway. The console uses a self-signed certificate, not one from a public certificate authority. Use your browser's Advanced or Show details control, then continue to the IP.
- Sign in with your UniFi credentials. For local-only setups, official help says the default username is admin if you have not changed it.
Option B — from UniFi Site Manager
If the console is already linked to a UI Account, go to unifi.ui.com. Official help calls this UniFi Site Manager. Sign in with your UI Account and open the site. This works from outside the house, as long as the console is online.
A Dream Machine, Cloud Gateway, CloudKey, or similar console is usually reached on port 443. A self-hosted UniFi Network Server often uses port 8443, so the address looks like https://10.0.0.2:8443.
Step 2Open Client Devices in the left sidebar
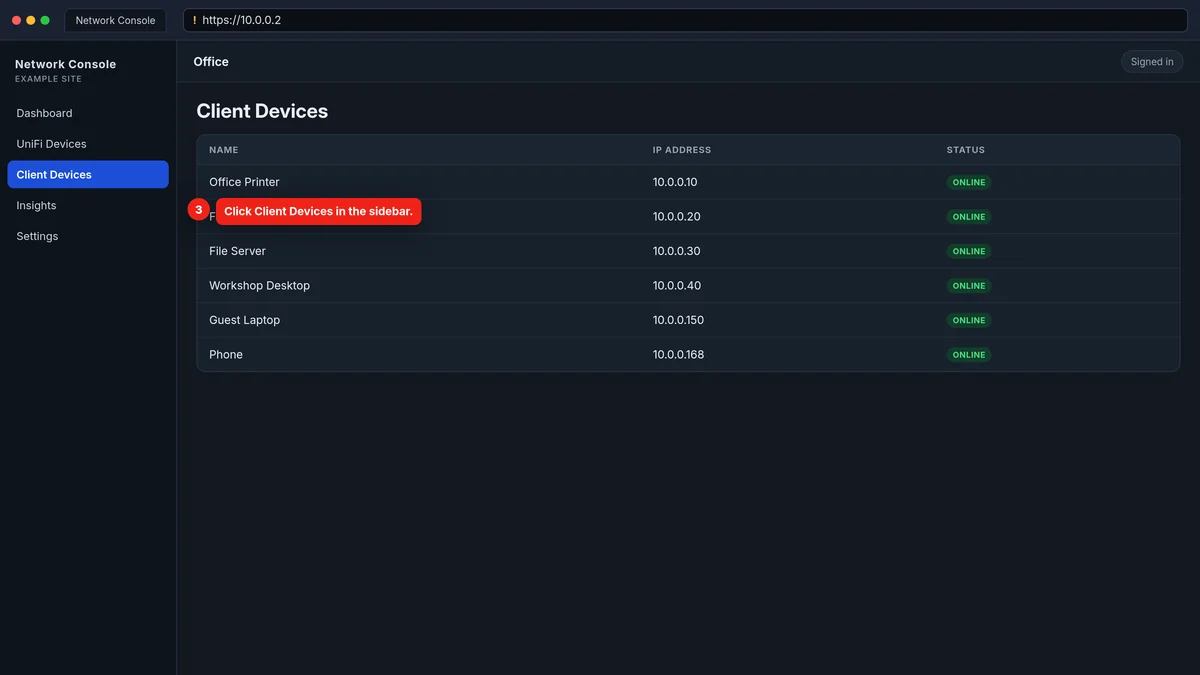
After you sign in, open the Network application if you landed on the UniFi OS home screen first. In the left sidebar, click Client Devices. Official UniFi help uses this exact label for the page where you set a Fixed IP Address.
You should see computers, phones, printers, and other clients with their current IP addresses. This list is not the same as UniFi Devices, which is where access points, switches, and the gateway itself appear. Do not start in UniFi Devices for this task.
If a name is generic, look at the IP, the MAC address, or the last-seen time. Current versions have Display Options to show the MAC column, and official help mentions a Fixed IP Address filter on this page. Show offline clients if a printer is turned off.
If your sidebar still says Clients instead of Client Devices, you are likely on an older UniFi Network version. It is the same page. Use that item and continue.
Step 3Click a device, then open the Settings tab
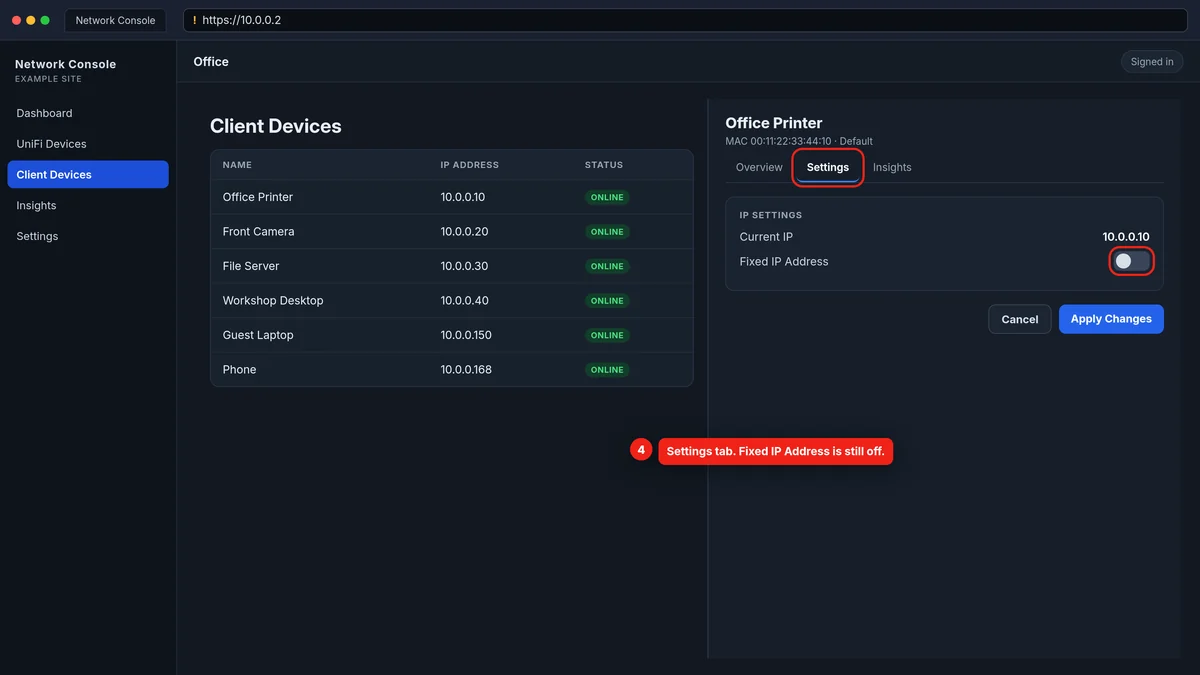
Click the device you want to reserve first. Start with something that should never change, such as a printer, NAS, desktop, or camera.
A side panel or details page opens. Open the Settings tab. Official help says: “Select the device and open its Settings.” On current UniFi Network releases, the reservation control sits in this tab, often in a group called IP Settings. You will also see the network the device is on (commonly Default) and the address it already has.
In earlier UniFi Network 6 and 7 interfaces, this was often under Configuration or a Network section, and the toggle was labeled Use Fixed IP Address. If you still see that wording, it is the same control.
Step 4Turn on Fixed IP Address and keep the current IP
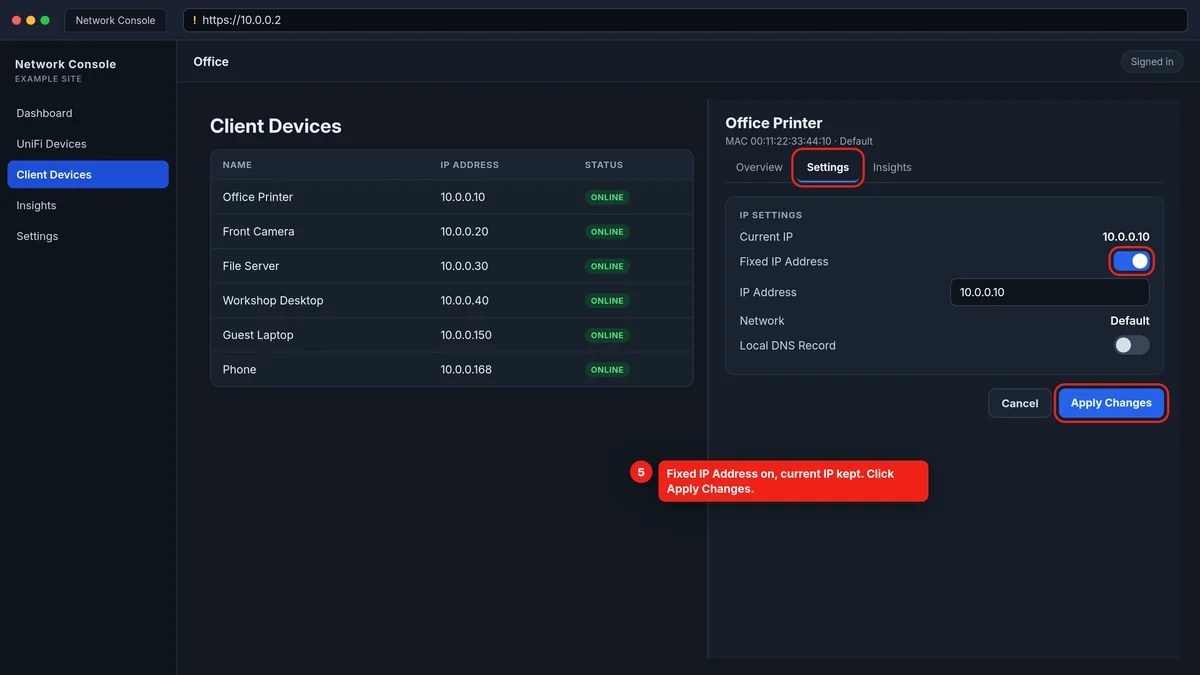
Turn on Fixed IP Address. Official help describes this as enabling Fixed IP Address “to set a DHCP reservation for this or another IP.”
When the fields appear, leave the current IP in place unless you have a reason to move the device. Keeping the current address is the safest choice on a network that is already working: printers, camera apps, bookmarks, and port forwards all keep working.
A Fixed IP in UniFi is not a static IP typed into the printer or computer itself. The device keeps asking the DHCP server for an address. The gateway always offers this reserved address to that device’s MAC address, and it should not offer the same address to another client. Leave the device’s own network settings on DHCP or automatic. If you also type a static address on the device, a typo can cause a duplicate IP. Official help warns about setting a static IP on the device’s adapter while that address is still inside the DHCP Range.
Optional: on the same Settings tab you can enable Local DNS Record and type a short name, such as printer or nas. Official help documents this as a shortcut for a Host (A) record. It only works for clients that use the UniFi gateway as their DNS server.
Step 5Apply Changes, then repeat for each device
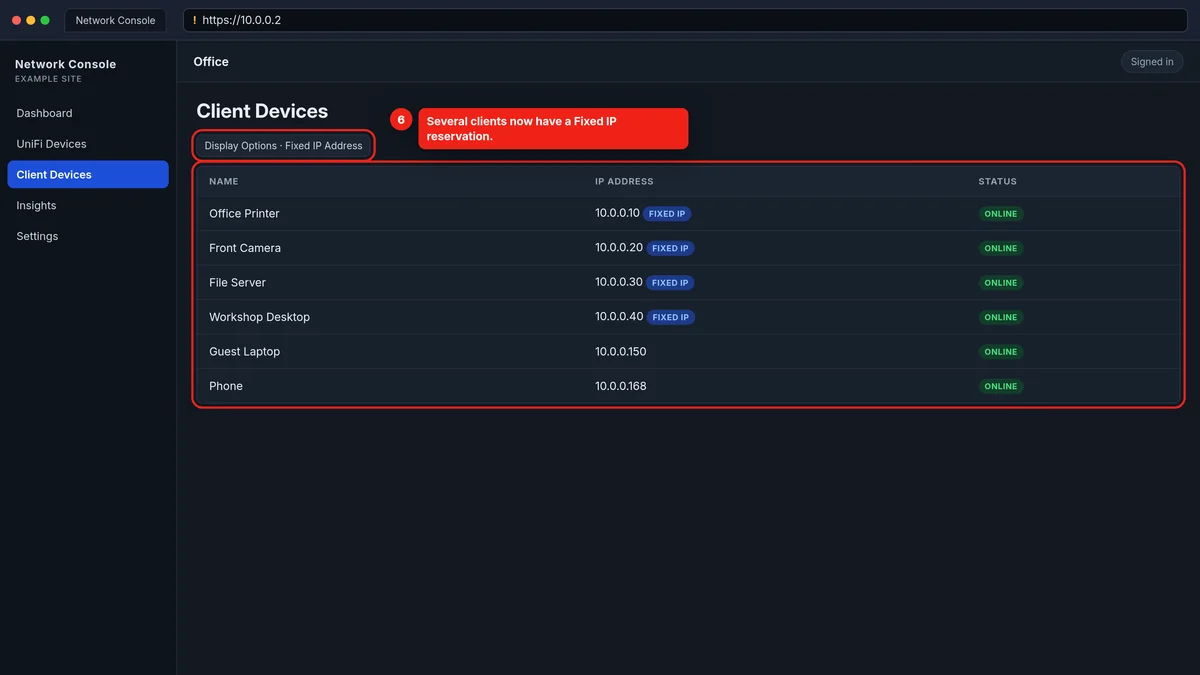
Click Apply Changes. That is the official button label in current UniFi help.
If you kept the device’s current IP, nothing on the network should need to change. If you picked a different address, the device may keep the old lease until it renews. Official help says the default DHCP lease time is one day (86,400 seconds). To force the new address, disconnect the device or reboot it, then confirm the new IP in Client Devices.
Repeat the same four clicks for every device you want to pin: select the client, open Settings, enable Fixed IP Address and keep (or choose) the IP, then click Apply Changes. Work through printers, cameras, NAS units, servers, and anything you reach by IP or with a port forward. You can also reserve laptops and phones. Leave guest phones and one-time visitors on the DHCP pool in the next step.
If a device never appears in the list, turn it on and connect it so UniFi can see its MAC address, then set the reservation. Some versions also let you add a client by MAC address; if you do not see that control, connect the device first. Do not confuse this with a Static IP or Network Override on a UniFi access point or switch under UniFi Devices. That setting is for UniFi hardware, not for client reservations.
Step 6Check Settings > Networks > Default > DHCP Range
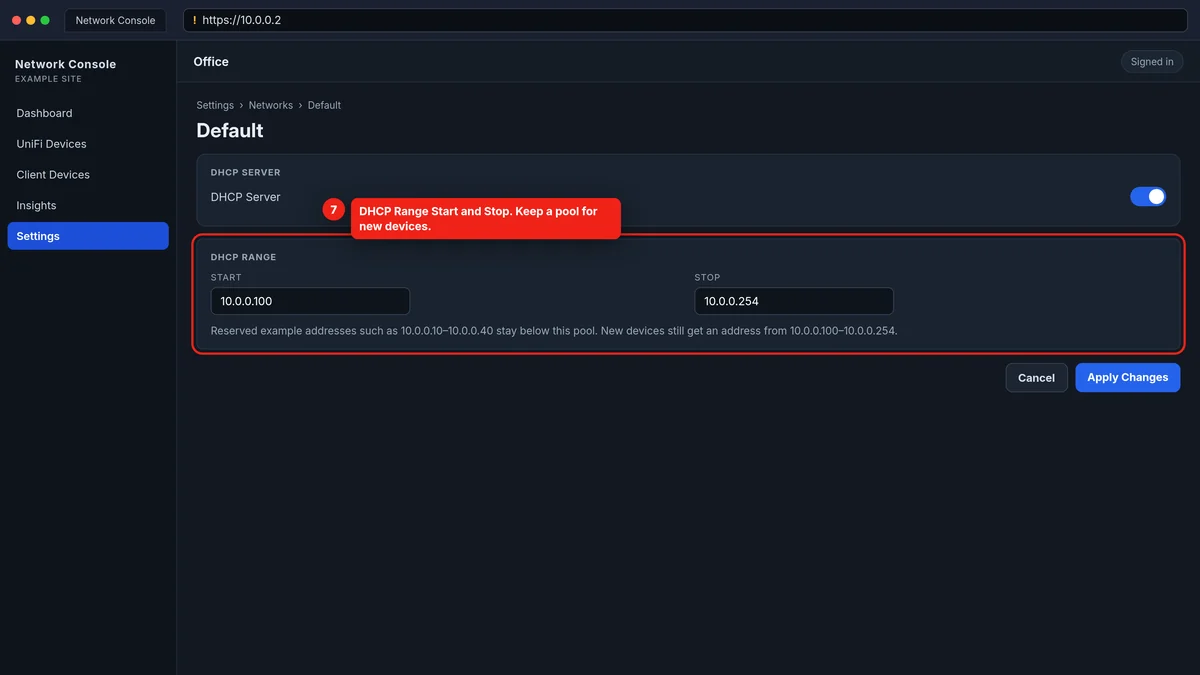
Reservations do not replace DHCP. You still want a pool for new phones, laptops, and guests.
- Go to Settings > Networks.
- Open your main LAN. On many fresh UniFi setups this network is named Default. If you renamed it (LAN, Home, Office), open that one instead.
- Find DHCP Range. Official help refers to the Start and Stop values of this range.
A very common pattern is a pool of .100–.254. On a 10.0.0.0/24 network whose gateway is 10.0.0.2, keep the gateway at 10.0.0.2, use 10.0.0.3 through 10.0.0.99 for reserved devices, set Start to 10.0.0.100, and set Stop to 10.0.0.254. New devices still get an automatic address from that pool.
Best practice: put reserved IPs outside the pool. Official UniFi help on duplicate IP addresses tells you to keep a static address set on a device itself outside the DHCP Range. For Fixed IP reservations, the DHCP server should also avoid handing a reserved address to another client, even inside the pool, but the cleaner design is still to place reserved IPs below (or otherwise outside) the range.
If a device already sits inside .100–.254, you can leave it reserved there or later move it below .100. Moving it changes the address, so update bookmarks or port forwards first. If you change the range, click Apply Changes, and do not shrink the pool so far that new devices run out of addresses. If you cannot edit Start and Stop, look for an automatic or auto-scale control and switch to a manual range.
Fixed IP vs static IP, and labels that change by version
A Fixed IP Address is a DHCP reservation on the UniFi gateway. The client stays on DHCP. A static IP is an address you type on the device itself, such as in a printer menu or in Windows or macOS adapter settings. Official help says a static address set on the device should be outside the DHCP Range, or you can get duplicate IPs. For almost every computer, phone, printer, and camera, the Fixed IP reservation is the simpler option.
Ubiquiti updates the Network application often. Official help already documents menu changes between nearby versions: for DNS records, Network 9.3 uses Settings > Policy Engine, and Network 9.4 uses Settings > Policy Table. Current official wording for this task is Client Devices, the Settings tab, Fixed IP Address (often under IP Settings), and Apply Changes. The DHCP pool is Settings > Networks > Default (or your LAN name) > DHCP Range, with Start and Stop. Remote access is UniFi Site Manager at unifi.ui.com. The local warning is officially a privacy or security warning; you proceed anyway.
On older UniFi Network 6 and 7 screens, the sidebar often said Clients, the panel was Configuration or a gear icon, and the toggle was Use Fixed IP Address. Some older screens said Apply or Save. Automatic or auto-scale options may hide Start and Stop until you choose a manual range. Browsers say “Your connection is not private” or a similar warning. If the console is not in English, compare the layout with the screenshots, not only the label text.
Tip: the official UniFi Network API cannot set Fixed IPs yet
The official UniFi Network Integration API can list clients, but it cannot turn Fixed IP Address on or off or write the reserved address. DHCP reservations still have to be created in the web interface, which is what this guide uses.
If you want this in the official API, there is a public feature request on the Ubiquiti Community: Set client fixed IPs (DHCP reservations) through the official UniFi Network API.
Related UniFi and network guides
If you are building out a UniFi network, these Gabak USA guides go with this one:
- Watch UniFi Protect cameras on a TV with the ViewPort
- Buy from Ubiquiti Canada and ship to the USA
- How to use the Tesmen TLP-900A/R network cable tester
Frequently asked questions
Is a UniFi Fixed IP Address the same as a static IP?
No. **Fixed IP Address** is a DHCP reservation on the gateway, and the device stays on DHCP. A static IP is typed on the device itself and should stay outside the DHCP Range.
Will new devices still get an address from DHCP?
Yes, if **DHCP Server** is enabled and the **DHCP Range** has free addresses. Reservations only pin the devices you configured; everything else uses Start–Stop, such as `.100–.254`.
Should reserved IPs be inside or outside the DHCP Range?
Put reserved IPs **outside** the pool when you can, for example `.3–.99` with DHCP from `.100–.254`. A reservation already inside the pool should not be handed to another device, but an outside-the-pool plan is cleaner.
Why did the device keep its old address after I changed the Fixed IP?
The DHCP lease may not have renewed yet. Official help says the default lease is one day. Disconnect or reboot the device, then check Client Devices again.
How do I open the UniFi console if I do not know the gateway IP?
Check the console’s LCD, type `unifi/` on the LAN if you have a Cloud Gateway, or use WiFiman Discovery. Then open `https://` that address, such as `https://10.0.0.2`.
Why does the browser warn me about a certificate?
The local console uses a self-signed certificate. Official setup help calls this a privacy or security warning and says it is normal; proceed anyway.
What if my menus do not say Client Devices or Fixed IP Address?
You are probably on an older version, or the console is not in English. Look for **Clients**, a **Settings** or **Configuration** panel, and **Use Fixed IP Address**. The pool is still under **Settings > Networks**, in **DHCP Range**.
Can I set Fixed IPs through the official UniFi Network API?
Not yet. The official Integration API can list clients but cannot set or remove a Fixed IP. Use this guide, and see the community feature request linked above if you need automation.


Comments
Comments appear after Gabriel reviews them.
Loading comments…